“Can I Bring Someone?” Solving Plus-One Waitlisting in Customer Insights Journeys (Part 1)

Events are rarely a solo experience.
In many scenarios, attendees want to bring a guest — a colleague, a partner, or a friend. But in Dynamics 365 Customer Insights – Journeys, handling “plus one” scenarios is not supported out-of-the-box.
This creates a real problem:
- Your event shows 1 registration
- But 2 people actually show up
Multiply that across dozens of attendees… and suddenly your event is over capacity.
In this article, I’ll show you how to solve this using:
- The built-in waitlist feature
- A Power Automate flow to create companion registrations
- Customer Insights Journeys includes a built-in waitlist for events
- It works well for single attendees but not for “plus one” scenarios
- We can extend it with Power Automate to create and manage companion registrations
The Problem with Plus-One Registrations
The typical flow looks like this:
- A contact registers and selects “I’ll bring someone”
- A single registration is created
- The event capacity increases by 1
- In reality, 2 people attend
This leads to:
- Overbooked venues
- Poor attendee experience
- Manual corrections by organizers
Possible Approaches (and Why They Fall Short)
❌ Disable plus-one option
Simple, but negatively impacts user experience.
❌ Manual registration handling
Works for small events, but not scalable.
The Solution
We extend the standard process with:
- A new “Companion” role in Event Registration
- A Power Automate flow that:
- Detects plus-one selections
- Creates an additional registration
- Applies waitlisting when needed
How does the process look like
Before diving into the implementation, here’s the idea:
- The attendee registers normally
- We detect if they selected “plus one”
- We create an additional registration:
- If capacity allows → Registered
- If not → Waitlisted
- We assign a custom role (Companion) to distinguish it
This keeps the event capacity accurate and leverages the native waitlist logic.
How to make this happen
This solution involves only one customization:
- Adding a new option in the “Primary Role” of the registration

If this sounds too heavy, you can use a ready-made solution: Companion Role Solution in Github.
Once created, you’ll see the new option in the registration form.
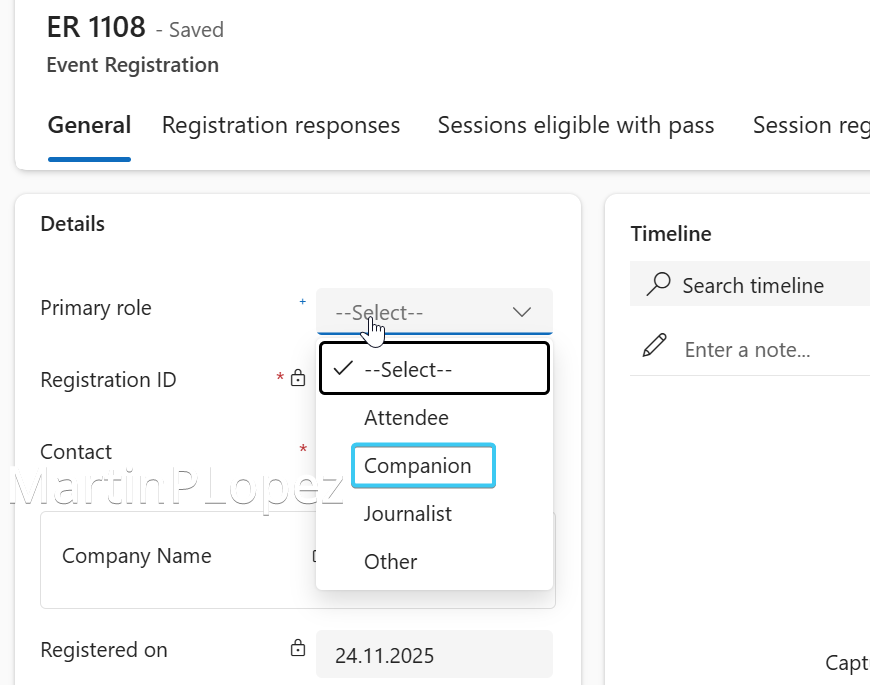
Setup of the Form
For setting up the form, you’ll need an unmapped field in the form (I recommend of type Dropdown) with the options to come alone or with a plus one.
⚠️ Important: ** Save the logical field name, this will be used to fetch the response in Power Automate
Make sure:
- The field is required
- Default value is “No, I’m coming alone” (recommended)

Also ensure:
The event has waitlist enabled — otherwise, everyone will be registered

Power Automate Flow for creating the extra registrations
Now we build the flow that will handle plus-one registrations automatically
1. Trigger
We’ll set up the following:
- Change type –> Added
- Table Name –> Event Registrations
- Scope –> Organization
- Filter Rows –>
msevtmgt_primaryrole eq null

2. Retrieve Field Submissions
We’ll add the List Rows Action for the Table Field Submissions:

Then it’s easier and more efficient to use a fetchxml query, you just have to modify the [LOGICALNAME] for the logical field name that you gave in your form while setting it up
<fetch top="1">
  <entity name="msdynmkt_marketingfieldsubmission">
    <attribute name="msdynmkt_localizedfieldvalue" />
    <filter>
      <condition attribute="msdynmkt_localizedfieldname" operator="like" value="[LOGICALNAME]" />
    </filter>
    <order attribute="msdynmkt_localizedfieldname" />
    <link-entity name="msdynmkt_marketingformsubmission" from="msdynmkt_marketingformsubmissionid" to="msdynmkt_marketingformsubmissionid" alias="Formsubmission">
      <filter>
        <condition attribute="msdynmkt_eventregistration" operator="eq" value="@{triggerOutputs()?['body/msevtmgt_eventregistrationid']}" />
      </filter>
    </link-entity>
  </entity>
</fetch>
3. Update Primary Registration
We’ll Update a Row with of the entity Event Registrations. With this action, we’ll update the current registration to give the role of the Attendee. In the Row ID, make sure to choose the Event Registration from the trigger a.k.a @{triggerOutputs()?['body/msevtmgt_eventregistrationid']}

4. Add a condition
We’ll add a condition where we check if the Localized Value Field (1) or in technical name @items('Apply_to_each')?['msdynmkt_localizedfieldvalue'] is equal to 2 (2) (which is the value os the second dropdown normally).
Be sure to use string(2) when you’re comparing it, as the value in the localized value field will be a string.

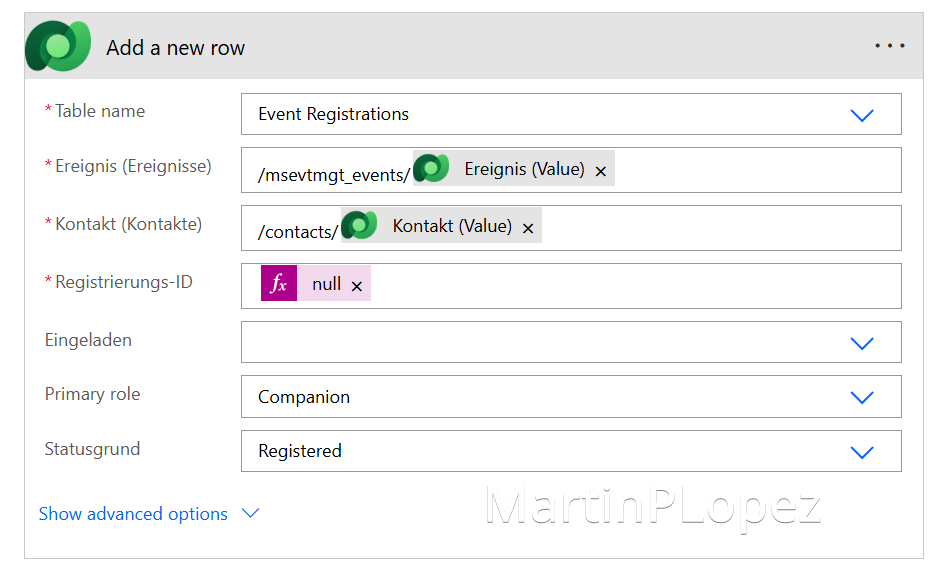
5. Add a Registration for the plus one
Add a new Row, where the following elements are there:
- Table Name –> Event Registrations
- Event (Events) –>
/msevtmgt_events/@{triggerOutputs()?['body/_msevtmgt_eventid_value']} - Contact (Contacts) –>
/contacts/@{triggerOutputs()?['body/_msevtmgt_contactid_value']} - Registration ID –>
@null(this is an expression) - Primary Role –> Companion
- Status code –> Registered
6. Add a waitlisted registration for the plus one
Add a new Row, where the following elements are there:
- Table Name –> Event Registrations
- Event (Events) –>
/msevtmgt_events/@{triggerOutputs()?['body/_msevtmgt_eventid_value']} - Contact (Contacts) –>
/contacts/@{triggerOutputs()?['body/_msevtmgt_contactid_value']} - Registration ID –>
@null(this is an expression) - Primary Role –> Companion
- Status code –> Waitlisted
But the main point of this action, it’s that it should run only when the previous action has failed (this happens due to an event being over capacity).
The steps can be found in this Microsoft Learn Article, but basically can be summarized in:
... –> Configure run after –> has failed
After configuring this, you should see a different line connecting your two “Add a Row”

Stay tuned for the Part 2
Great! This has been the first part of the “Can I Bring Someone?” Series. We’d gone over:
- How to capture plus-one intent in forms
- How to extend registration roles
- How to automate companion registrations with Power Automate
In Part 2, we’ll take it further:
- Notify users if their plus one is waitlisted
- Allow them to cancel if needed
- Send updates when spots become available
I hope this first part helps you build a cleaner and more reliable registration process. In the next article of the series, we’ll look at how to communicate the outcome to attendees and make the experience smoother when plus ones are involved.
Until then, take care 🐣