Setting Up Payments for Events in Customer Insights - Journeys
Learn how to integrate paid event registrations in Dynamics 365 Customer Insights - Journeys using Stripe, Azure Functions, Dataverse, managed identities, and webhooks.

On this page
- Do you need Payments?
- Architecting the solution
- So what tooling do we use?
- Implementation Steps
- 1. What you’ll need from Dynamics Customer Insights
- 2. Setting up an account in an online payment provider
- 3. Azure Functions ❤️ Customer Insights Journeys
- Learnings from the implementation
- Conclusion
- Need help with Customer Insights - Journeys?
This September, I’ve been digging into something I’d been curious about but had never worked with before: paid events in Dynamics 365 Customer Insights - Journeys.
But here was a problem from the beginning: There’s not much written about it, at least I couldn’t find anything that belonged to the Real Time Marketing Era 😅 And from Microsoft we received this very cryptic documentation, that I needed help understanding.
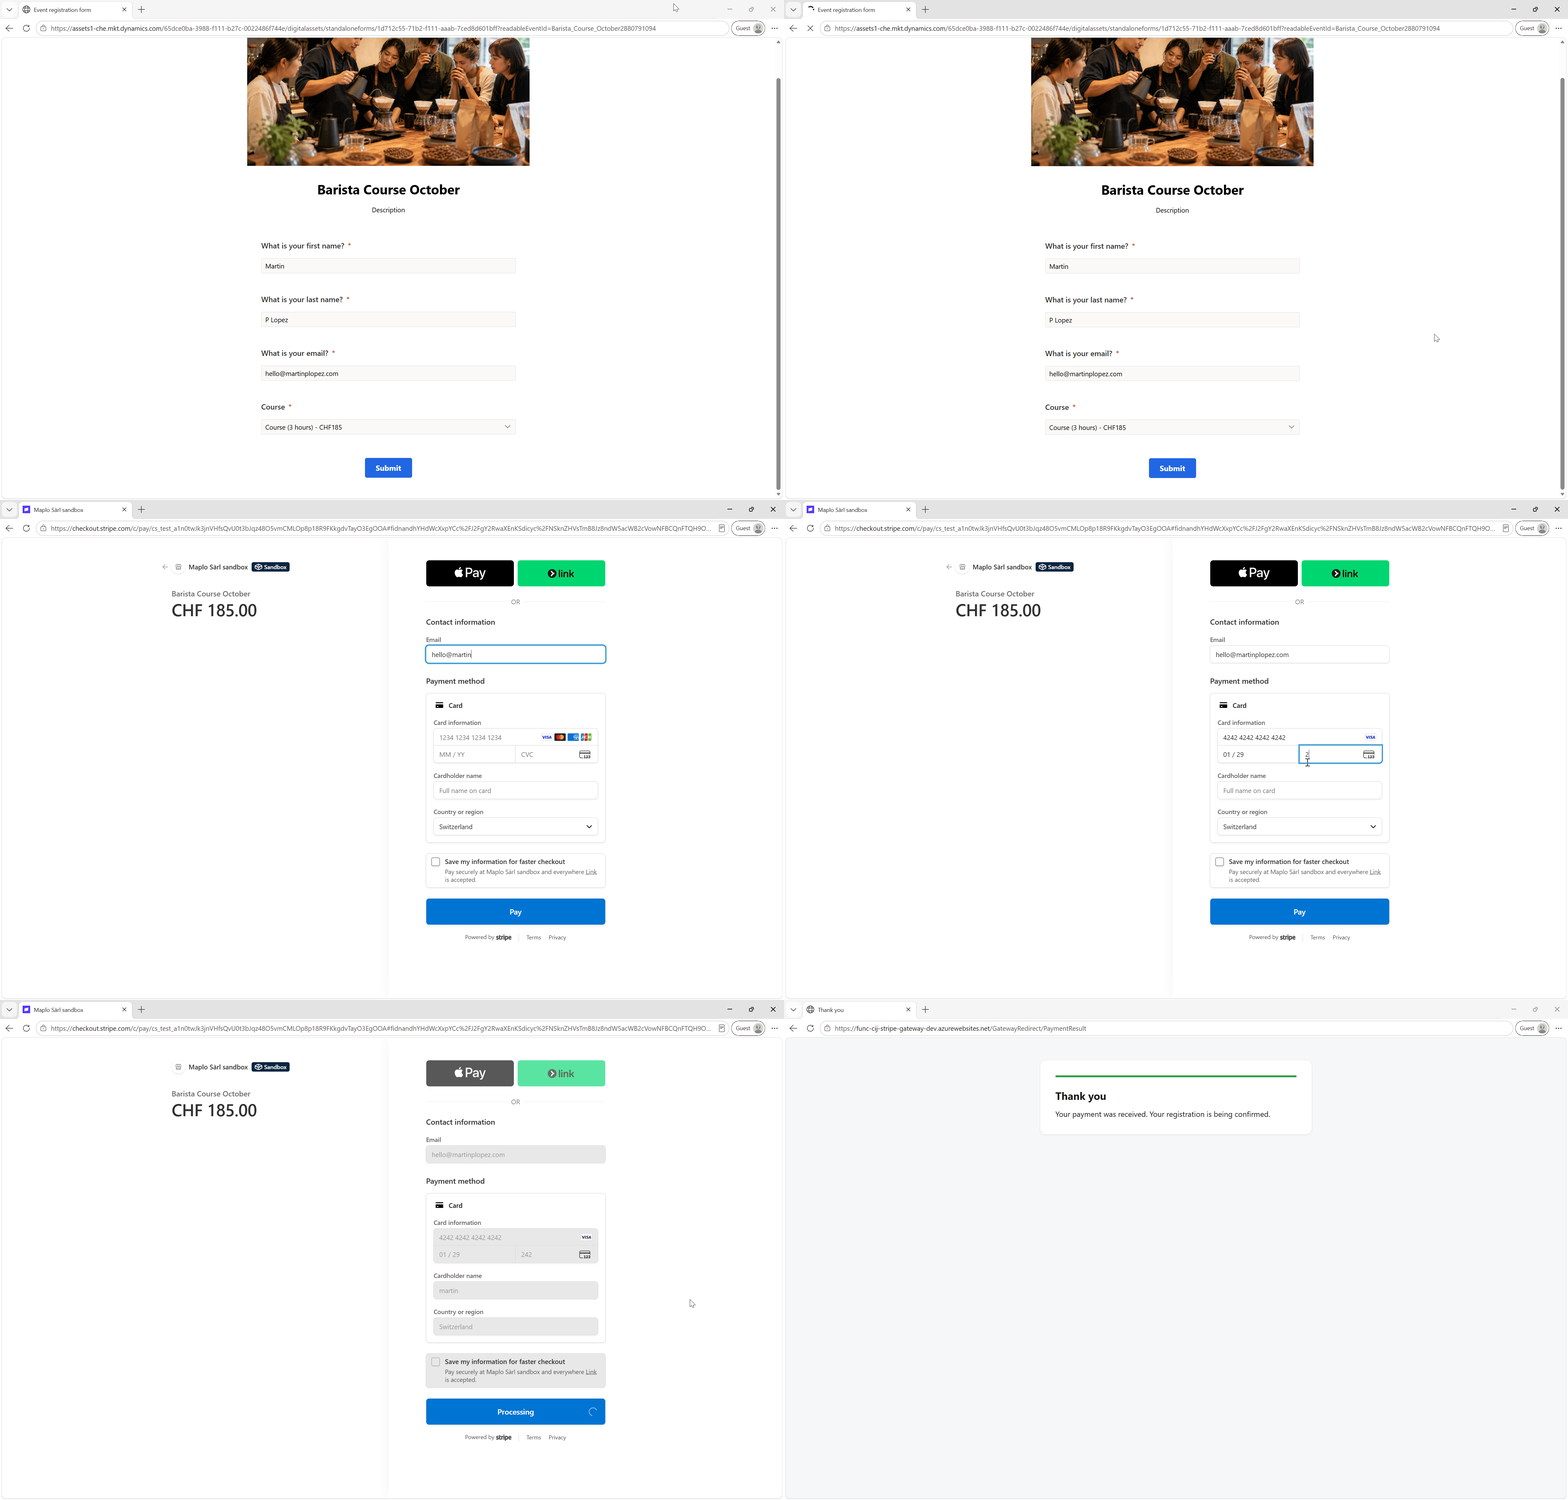
So I got my hands dirty and made it work. Along the way, I learned how to build the payment integration, what to watch out for, and what to avoid. You want to see it straight away? Here’s an example 😉
NOTE
TL;DR:
Customer Insights - Journeys supports paid event registrations, but you need to provide the payment infrastructure yourself.
In this article, I use Stripe and Azure Functions to build the redirect and webhook endpoints, authenticate to Dataverse with managed identity, finalize successful payments through msevtmgt_finalizeregistrationpayment, and handle the reliability and security issues that come with connecting a payment provider to an event reservation.
Do you need Payments?
Before building anything, it is worth considering the three options available to you.
- Register for free, invoice afterwards. Boring, and right more often than people expect. No gateway, no refunds, no webhook. Useful if you don’t run many paid events or have many attendees.
- Sell the ticket in an external ticketing tool and sync attendees into Dataverse. You give up the single registration experience and need to sync the registrations back into Customer Insights - Journeys.
- Keep registration in Customer Insights - Journeys and add your own gateway. The right call when registration, capacity and the confirmation journey all have to stay in one place.
Option 3 is the one this article is about. There is a development cost, but there is also an ongoing maintenance cost. A payment integration is not a feature you ship and forget, it is something somebody has to be able to debug on a Monday morning when an attendee says they paid twice.
If you can live with option 1, take option 1 🙂
Architecting the solution
So what does Customer Insights - Journeys actually require from you? Two endpoints:
| Endpoint | Called by | What it must do |
|---|---|---|
GET /<your-path>/Pay?purchaseId={guid}&returnUrl={url} | the attendee’s browser, redirected there from the registration page | read the purchase, take the money, send the attendee back to a return page |
POST /<your-path>/Webhook | the payment provider | tell Dataverse what happened, by executing msevtmgt_finalizeregistrationpayment |
Customer Insights - Journeys connects to the redirect endpoint through a payment provider record, while the webhook is configured directly in Stripe.
When you build this, you should have a happy path like this one:
So what tooling do we use?
First, you need to choose a payment provider. This decision matters because the provider will take a percentage of each transaction, so do your research.
For my case, as I want to give an example of a widely used provider, I chose Stripe to integrate the payment.
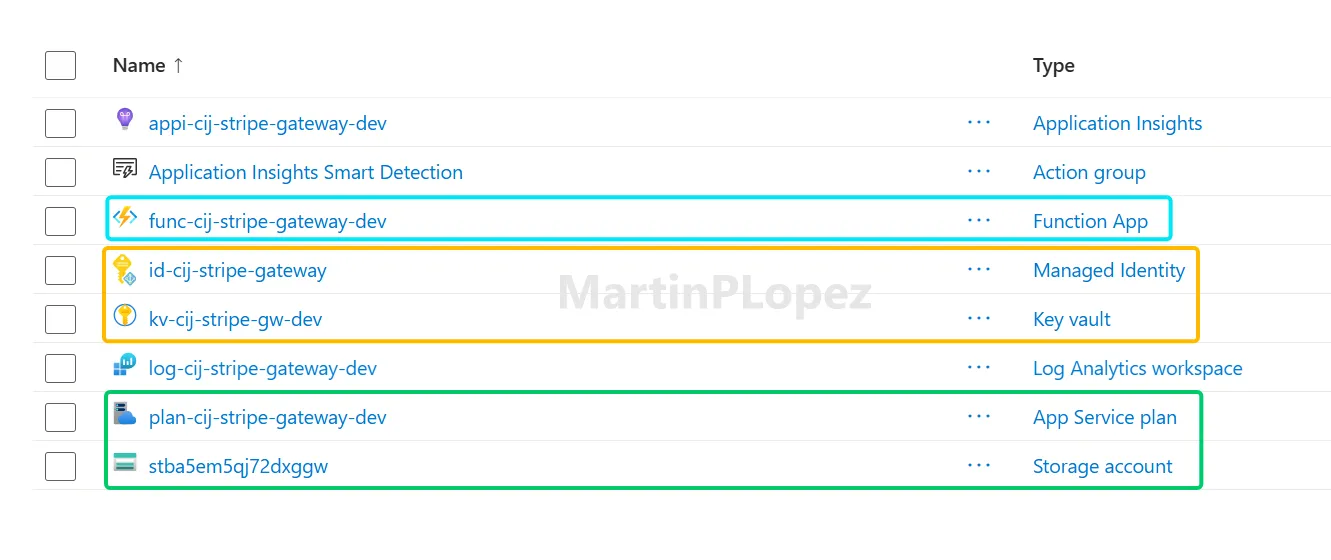
And for the 2 Endpoints (3 if we count a custom return page), I chose to build everything with Azure Functions, because:
- Microsoft-native hosting: the integration stays within the Azure ecosystem.
- Low operating cost: for this workload, Azure Functions can be extremely inexpensive.
- Secure secret storage: Stripe credentials can live in Azure Key Vault.
- Managed identity for Dataverse: the Functions app can authenticate without storing a Dataverse client secret.
So my final Azure setup looks like this:
Implementation Steps
1. What you’ll need from Dynamics Customer Insights
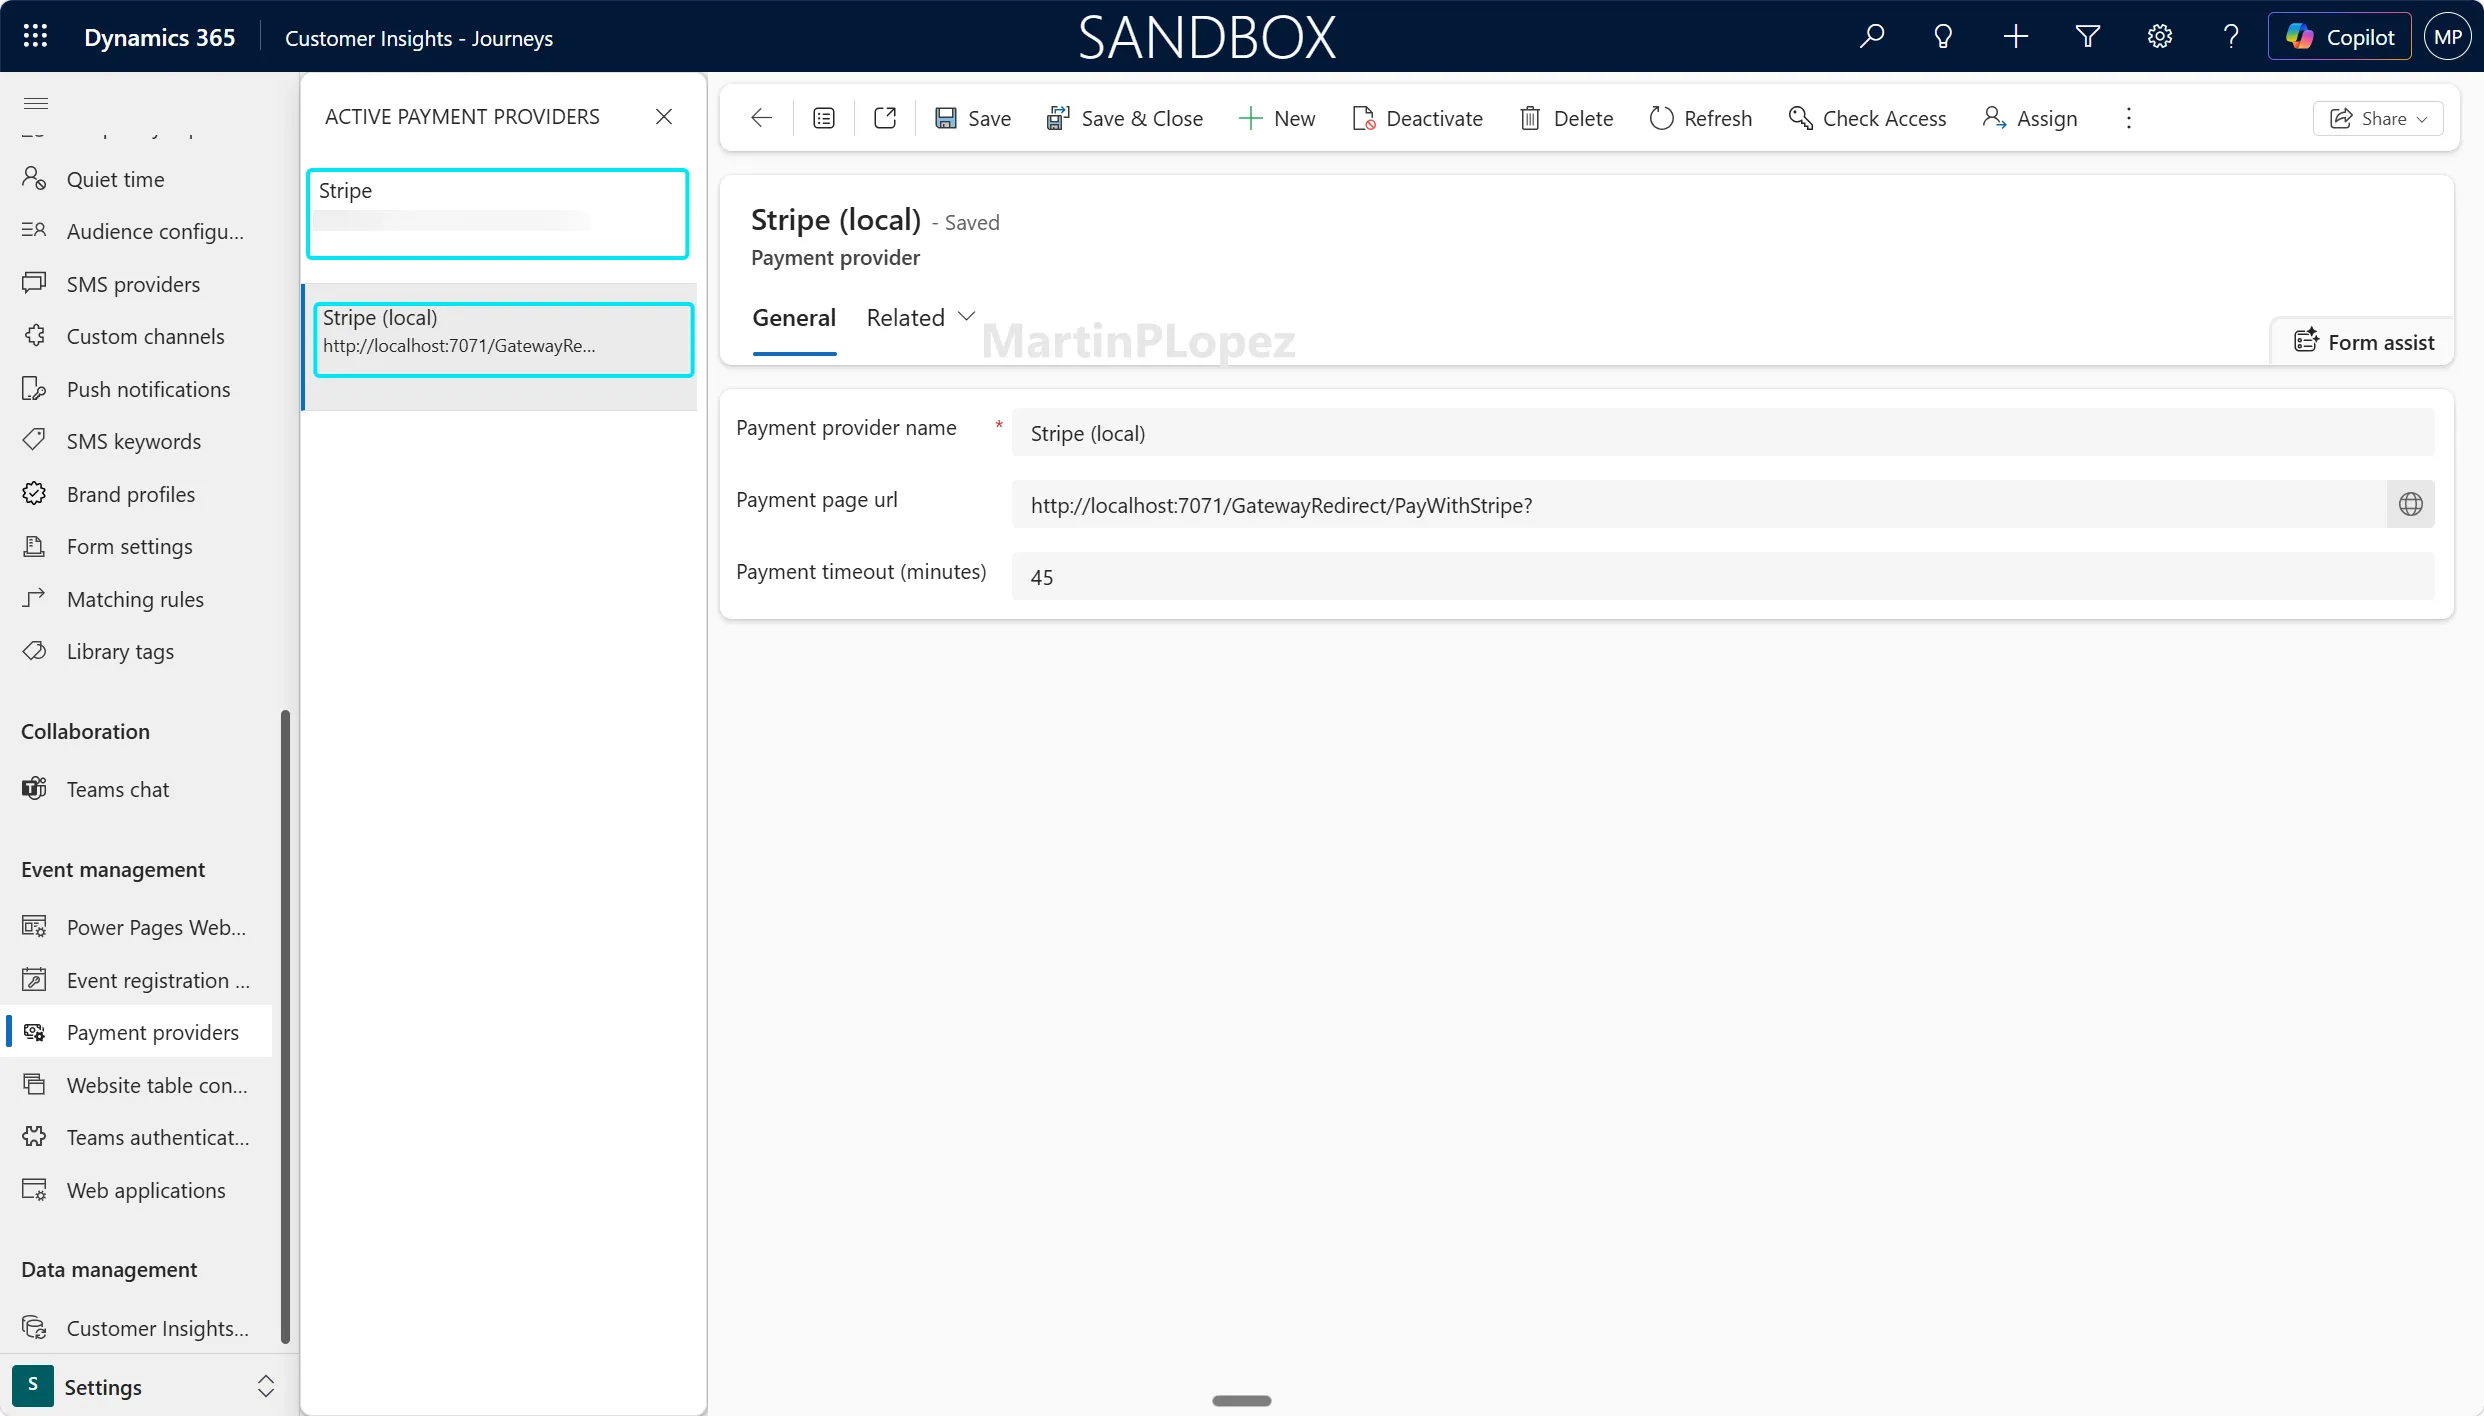
First thing to build in Customer Insights journeys is a payment provider record (msevtmgt_paymentprovider): the partial URL of your payment page (the first Azure Function endpoint), plus msevtmgt_paymenttimeoutminutes, which is how long the seat stays reserved. The second one is configured on the provider’s side and never touches Dataverse configuration at all.
TIP
Dev tips
To debug the function locally, you will need a record redirecting to your local server like the one shown in the picture.
2. Setting up an account in an online payment provider
In my case, I chose Stripe, and it is a very straightforward process. Under this website, you can register, and then you can open a sandbox account and generate a new API key for your tests:
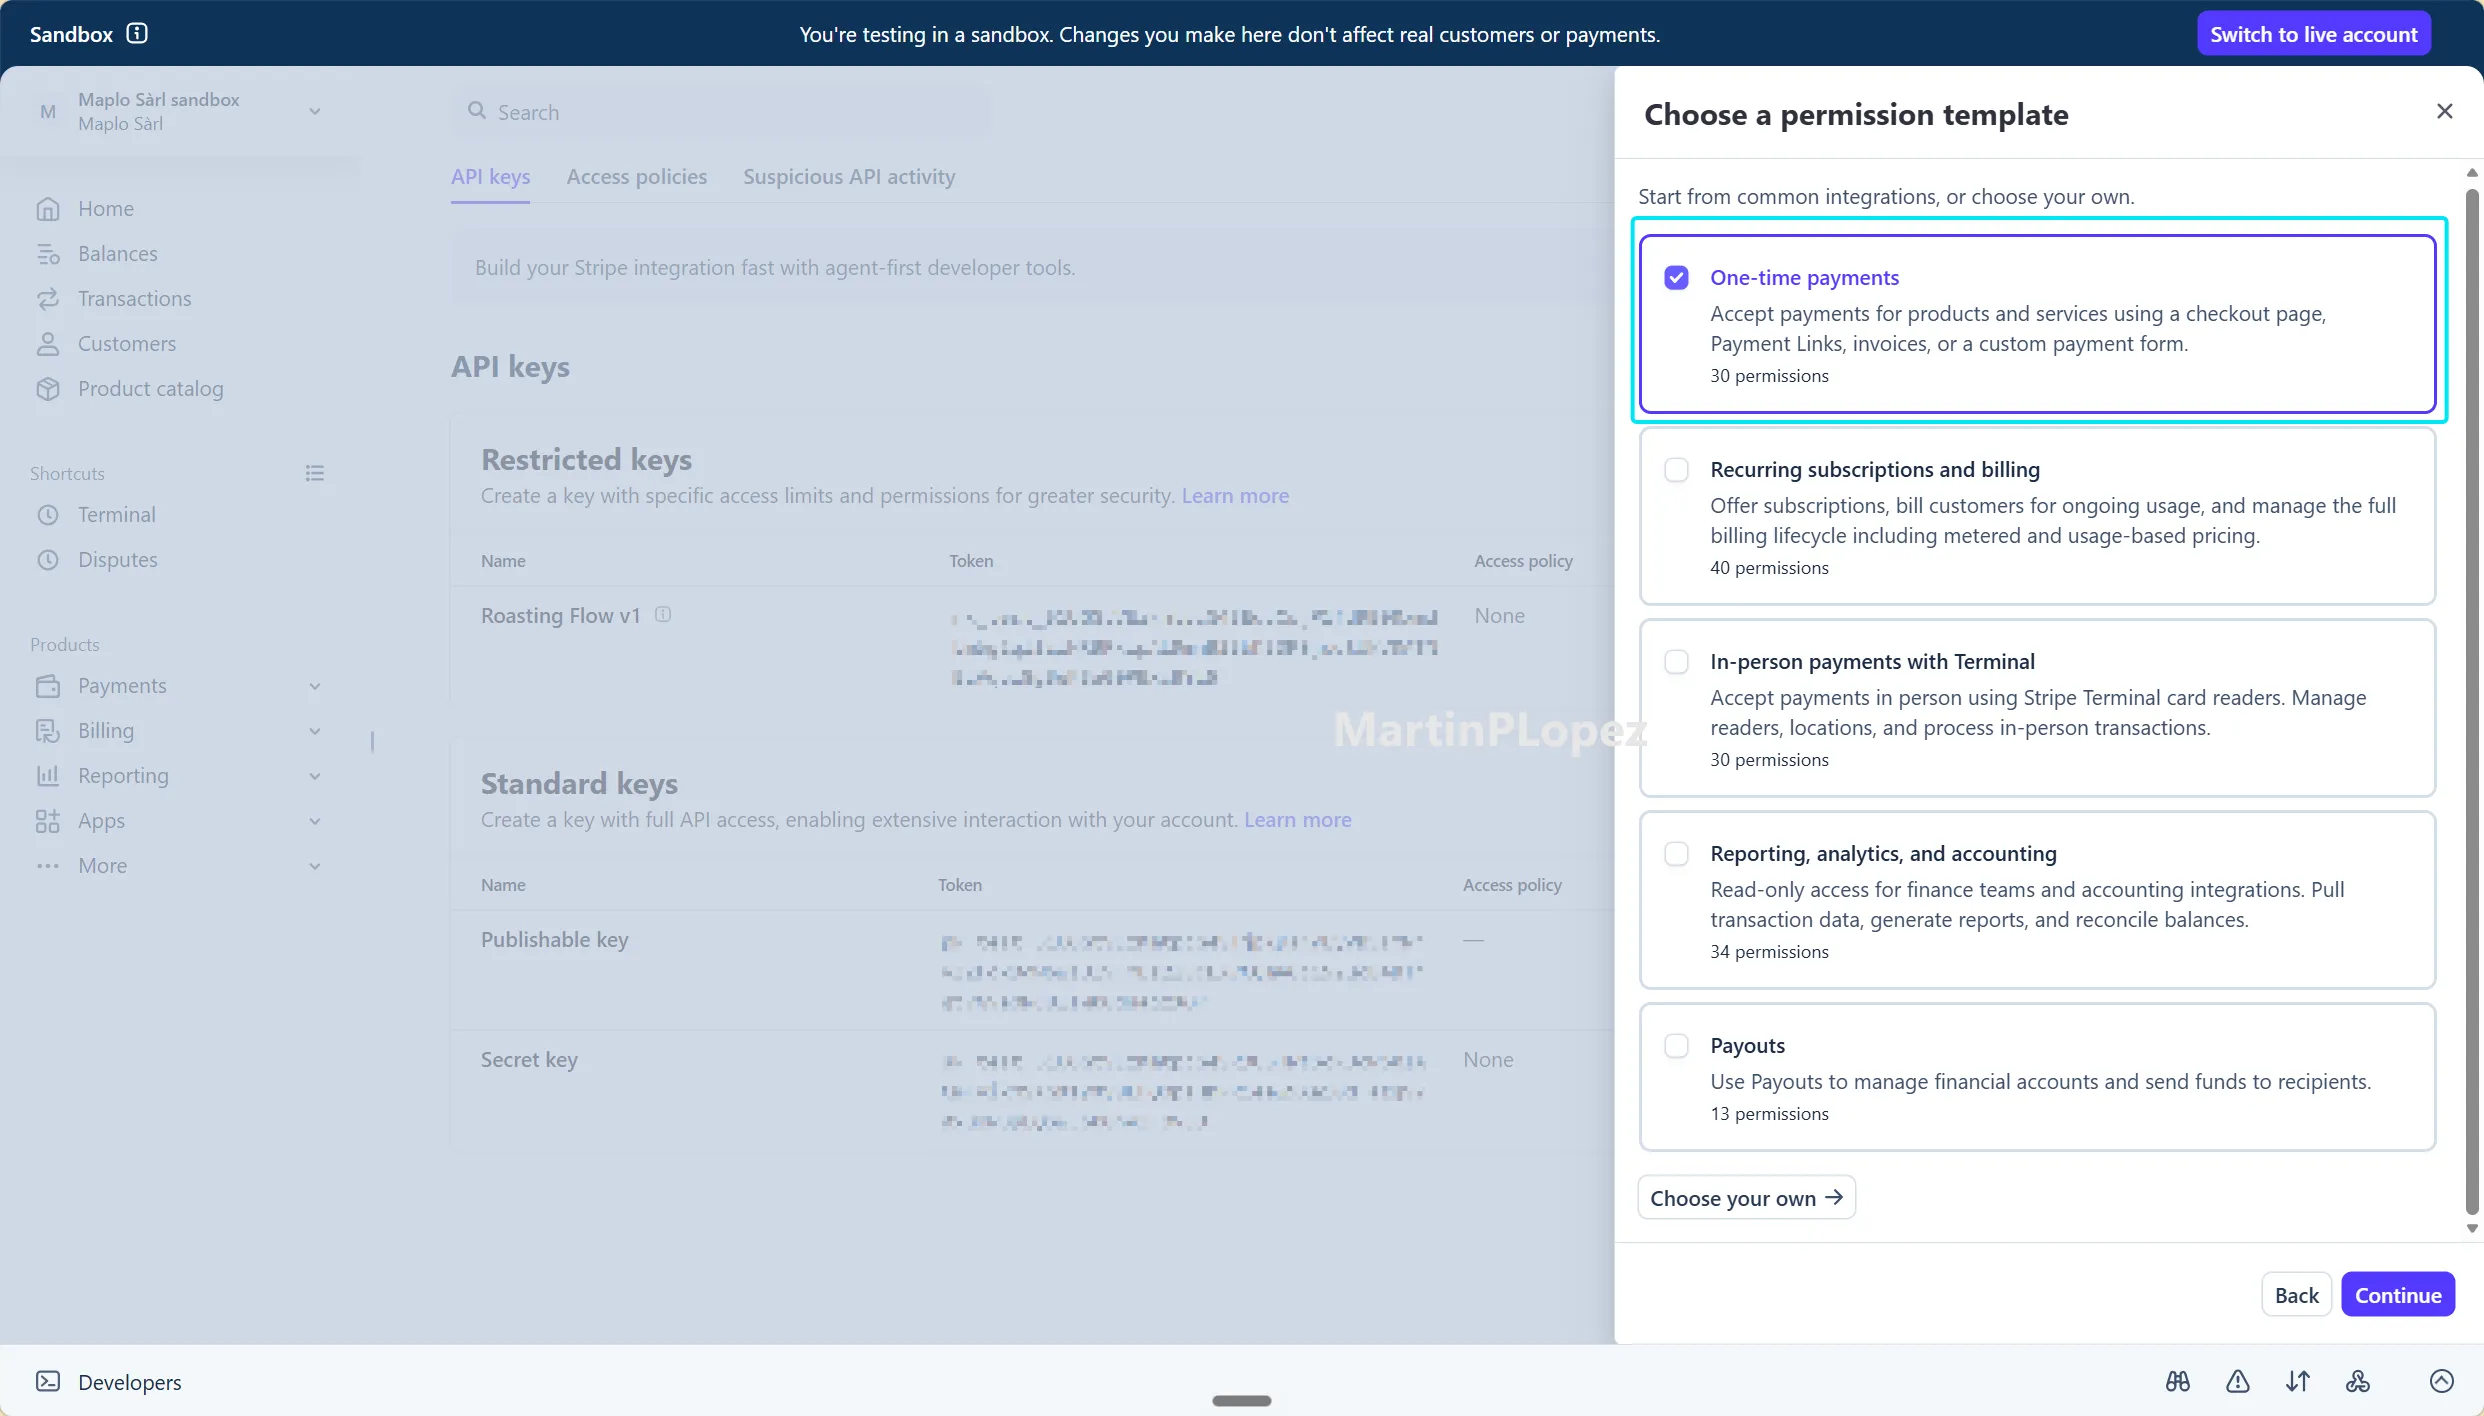
I found the one-time payments permission template works well for this scenario.
The good thing about using a test account is that you can test without real money and check if the checkout is working and it’s redirecting correctly from your customer insights registration form to the return page.
3. Azure Functions ❤️ Customer Insights Journeys
Before we build them, things to take into consideration:
- Both Azure Functions use anonymous HTTP triggers, but that does not mean both requests are trusted. Dataverse builds the redirect URL for a browser, and a payment provider cannot send a function key. Neither caller can be authenticated with a shared secret, so each one has to be authenticated by what it is: the webhook by its signature, the redirect endpoint not at all. The redirect endpoint therefore has to treat every incoming query parameter as untrusted.
- The money and the record of the money live in different systems. Stripe knows a payment succeeded. Dataverse knows whether a seat is still reserved. Nothing makes those two agree, and no transaction spans them.
- Webhooks are delivered at least once, in no particular order. Every check has to be written for “this exact event may arrive again, or late, or after its opposite”.
- The reservation has a deadline, and so does the checkout session. Order those two wrongly and money arrives for a seat that is already gone.
- A user-assigned managed identity, and no Dataverse secret anywhere. Not in Key Vault, not in an app setting, not in the repository. The identity is added as an application user in the target environment, and that is the whole authentication story on the Dataverse side.
- The payment provider’s two secrets in Key Vault, referenced from app settings and resolved by that same identity. Two secrets in the entire system, both belonging to Stripe.
Now, to the code.
The whole gateway is around 3,000 lines of C#, and most of it is not interesting. What is interesting is the handful of functions I got wrong the first time. So I put a skeleton of the project in my GitHub repository: the interfaces, the configuration, the currency conversion and the order of the checks are all there, but the bodies of the two endpoints are // TODO. It compiles.
It does not take a payment.
That is on purpose, I deliberately left the endpoint bodies incomplete. A payment gateway is not something I want readers to copy into production without understanding the validation, retry and failure paths around it. Use the skeleton as a starting point, whether you complete it yourself or with AI assistance, but make sure you understand every check before taking real payments.
The first function creates the Stripe Checkout session:
var createOptions = new SessionCreateOptions
{
    Mode = "payment",
    PaymentMethodTypes = ["card"],              // load-bearing, see below
    LineItems = [new SessionLineItemOptions
    {
        Quantity = 1,
        PriceData = new SessionLineItemPriceDataOptions
        {
            Currency    = currency,             // lower case: "chf"
            UnitAmount  = unitAmount,           // minor units: 25.00 -> 2500
            ProductData = new() { Name = request.LineItemName },
        },
    }],
    Metadata          = new() { ["order_id"] = orderId },   // the only id the webhook reads back
    PaymentIntentData = new SessionPaymentIntentDataOptions
    {
        Metadata = new() { ["order_id"] = orderId },        // Checkout does not copy it for you
    },
    ClientReferenceId = orderId,                // for the dashboard, never trusted
    SuccessUrl = successUrl,
    CancelUrl  = cancelUrl,
    ExpiresAt  = expiresAt,                     // must expire BEFORE the Dataverse reservation
};
Three Stripe details that caused me trouble:
PaymentMethodTypes = ["card"]is load-bearing. Cards settle immediately, socheckout.session.completedarrives while the seat is still reserved. Add anything asynchronous, a bank debit or a voucher, and the normal case becomes: the completed event arrives unpaid, the reservation lapses, and the money lands days later against a purchase Dataverse has already closed. Those attendees get refunded instead of registered.order_idgoes on the session and on the payment intent. Checkout does not copy session metadata onto the payment intent, and “has this purchase already been paid?” is a question you ask of payment intents.client_reference_idis written and never read back. More on that in the next section.
The second one is the function this whole article is really about, the call that tells Dataverse the money arrived:
var request = new OrganizationRequest("msevtmgt_finalizeregistrationpayment")
{
    ["msevtmgt_purchaseid"]    = purchaseId,
    ["msevtmgt_paymentstatus"] = new OptionSetValue((int)status),  // 100000001 = Completed
};

await service.ExecuteAsync(request, cancellationToken);
That is it. Two parameters, and Event Management does the rest: it marks the purchase paid and turns the reservation into a registration.
Now look at what comes back: nothing. The custom API answers with a void response whether or not it did anything. “Dataverse accepted the call” and “the attendee has a paid registration” are two different claims, and only the first one is proven, which is why the gateway reads msevtmgt_paid back afterwards.
The rest of the webhook is the unglamorous part that matters. Every delivery ends at exactly one of 22 named outcomes, finalized, already-cancelled, session-purchase-mismatch, late-payment-refunded, each logged as a single line with a severity. That string is what you alert on, and the alert for a duplicate payment is one to set up before you go live, not after an attendee tells you they paid twice.
Learnings from the implementation
- A least-privilege security role, derived rather than guessed. I got the first deployment green with the built-in
Event AdministratorplusBasic Userpair, which is about 900 privileges, then built a custom role by taking privileges from that pair, at the depth they have there, until it still worked. It ended at roughly a hundred. Because the custom role is a strict subset of a configuration known to work, a failure means the list cut something real, and the Dataverse fault names the exact privilege. That is a much better afternoon than guessing upwards from nothing. - Add a back button to the return page (if you created one like me). When creating a return page, it will just contain a successful or an unsuccessful web page. You could add a button so the client doesn’t feel like this is the end and he can go back to the event or the journey.
- Set up an alert in the logs to get notified of duplicate charges. When a payment is received twice for one registration, you should be able to identify it and correct it as soon as possible. You can set up Log Analytics for the Azure Functions.
And my favourite: ⭐ Even though the Documentation points at using this feature only via Event API, it works with standard event registration forms.
When developing this feature, it’s easier to test it through the Event API, so you can programmatically trigger the registrations. Once it’s configured and the Azure Functions are deployed, you can create an event with a form where you can just put a pass and select the payment provider. It will redirect to the checkout page and to your return pages correctly.
Conclusion
Paid registrations in Customer Insights Journeys require an implementation that might not make sense for every organization.
Before building it, consider the number of paid events you run, the volume of registrations you handle, and whether the value of keeping the entire registration experience inside Customer Insights - Journeys justifies the development and ongoing maintenance.
Ultimately, it is a solid solution, absolutely doable, and the platform holds up its end. Just go in knowing that you are adopting a small piece of payment infrastructure, not switching on a feature 💳
Need help with Customer Insights - Journeys?
If you’re planning a paid-event solution, integration, or broader Customer Insights - Journeys implementation, I can help you design and deliver it without overcomplicating the architecture.
If you’re working on something similar, feel free to get in touch.
One useful CI-J idea, every other Friday.
Sign up for my newsletter and be the first to know about new blog articles, Customer Insights discoveries, and more.