Build a Branded Event Website in 20 Minutes with Power Pages and Dynamics 365 Customer Insights – Journeys

Some years ago, I was responsible for two Power Pages sites (at that time called Dynamics Portals) that were connected to Dynamics 365 Customer Insights – Journeys (back then: Dynamics 365 Marketing). At that time, adapting and branding an event portal was… painful. It took a lot of effort to get something that looked good and felt on-brand.
Fast forward to today: after a few renames and a lot of updates, Microsoft has evolved these tools to the point where I was able to set up a portal, brand it, and connect it to my Dynamics 365 Customer Insights – Journeys environment in as little as 20 minutes.
The best part? After a bit of experimenting, I realized you can do this mostly by customizing and copying a code snippet — no deep coding skills needed.
I decided to put together this guide for you, so you can also set up your branded event website with no code knowledge needed. 😊
I’m basing this on Microsoft’s guide:
Build an event registration portal with Power Pages
…but I had to fight a bit with the tools to understand what’s the quickest and least painful way of setting things up. This article is that shortcut.
TL;DR:
- Use the Event portal template in Power Pages.
- Quickly brand the hero, header and footer with your logo and imagery.
- Replace the default registration logic with the embedded form snippet from Customer Insights – Journeys.
- In CIJ, add your domain and Power Pages website under Event Management.
- Create an event, point it to your portal and publish — your branded event page is live. 🚀
What will you need?
For this use case, if you want to do it in record time, we have to be prepared beforehand, so I advice you to have the following prepared:
- Logo of your company (without background works even better, I’m using a png)
- A cover picture that will match with your company Branding
- The name of your Company and a Heading Text
- A license of Powerapps (One can start with a Trial license and convert it in a production license)
- An Omega Speedmaster or Rolex Daytona to measure your speed (optional — the clock app on your computer works just as well 😁)
⚠️ Important: This guide is accurate & working at date of publishing
How to build it
To achieve this in record time, we’ll divide the process into two parts:
- Set up Power Pages
- Set up Dynamics 365 Customer Insights – Journeys
1. Set up Power Pages
Create the site
Start at Power Pages Get Started.
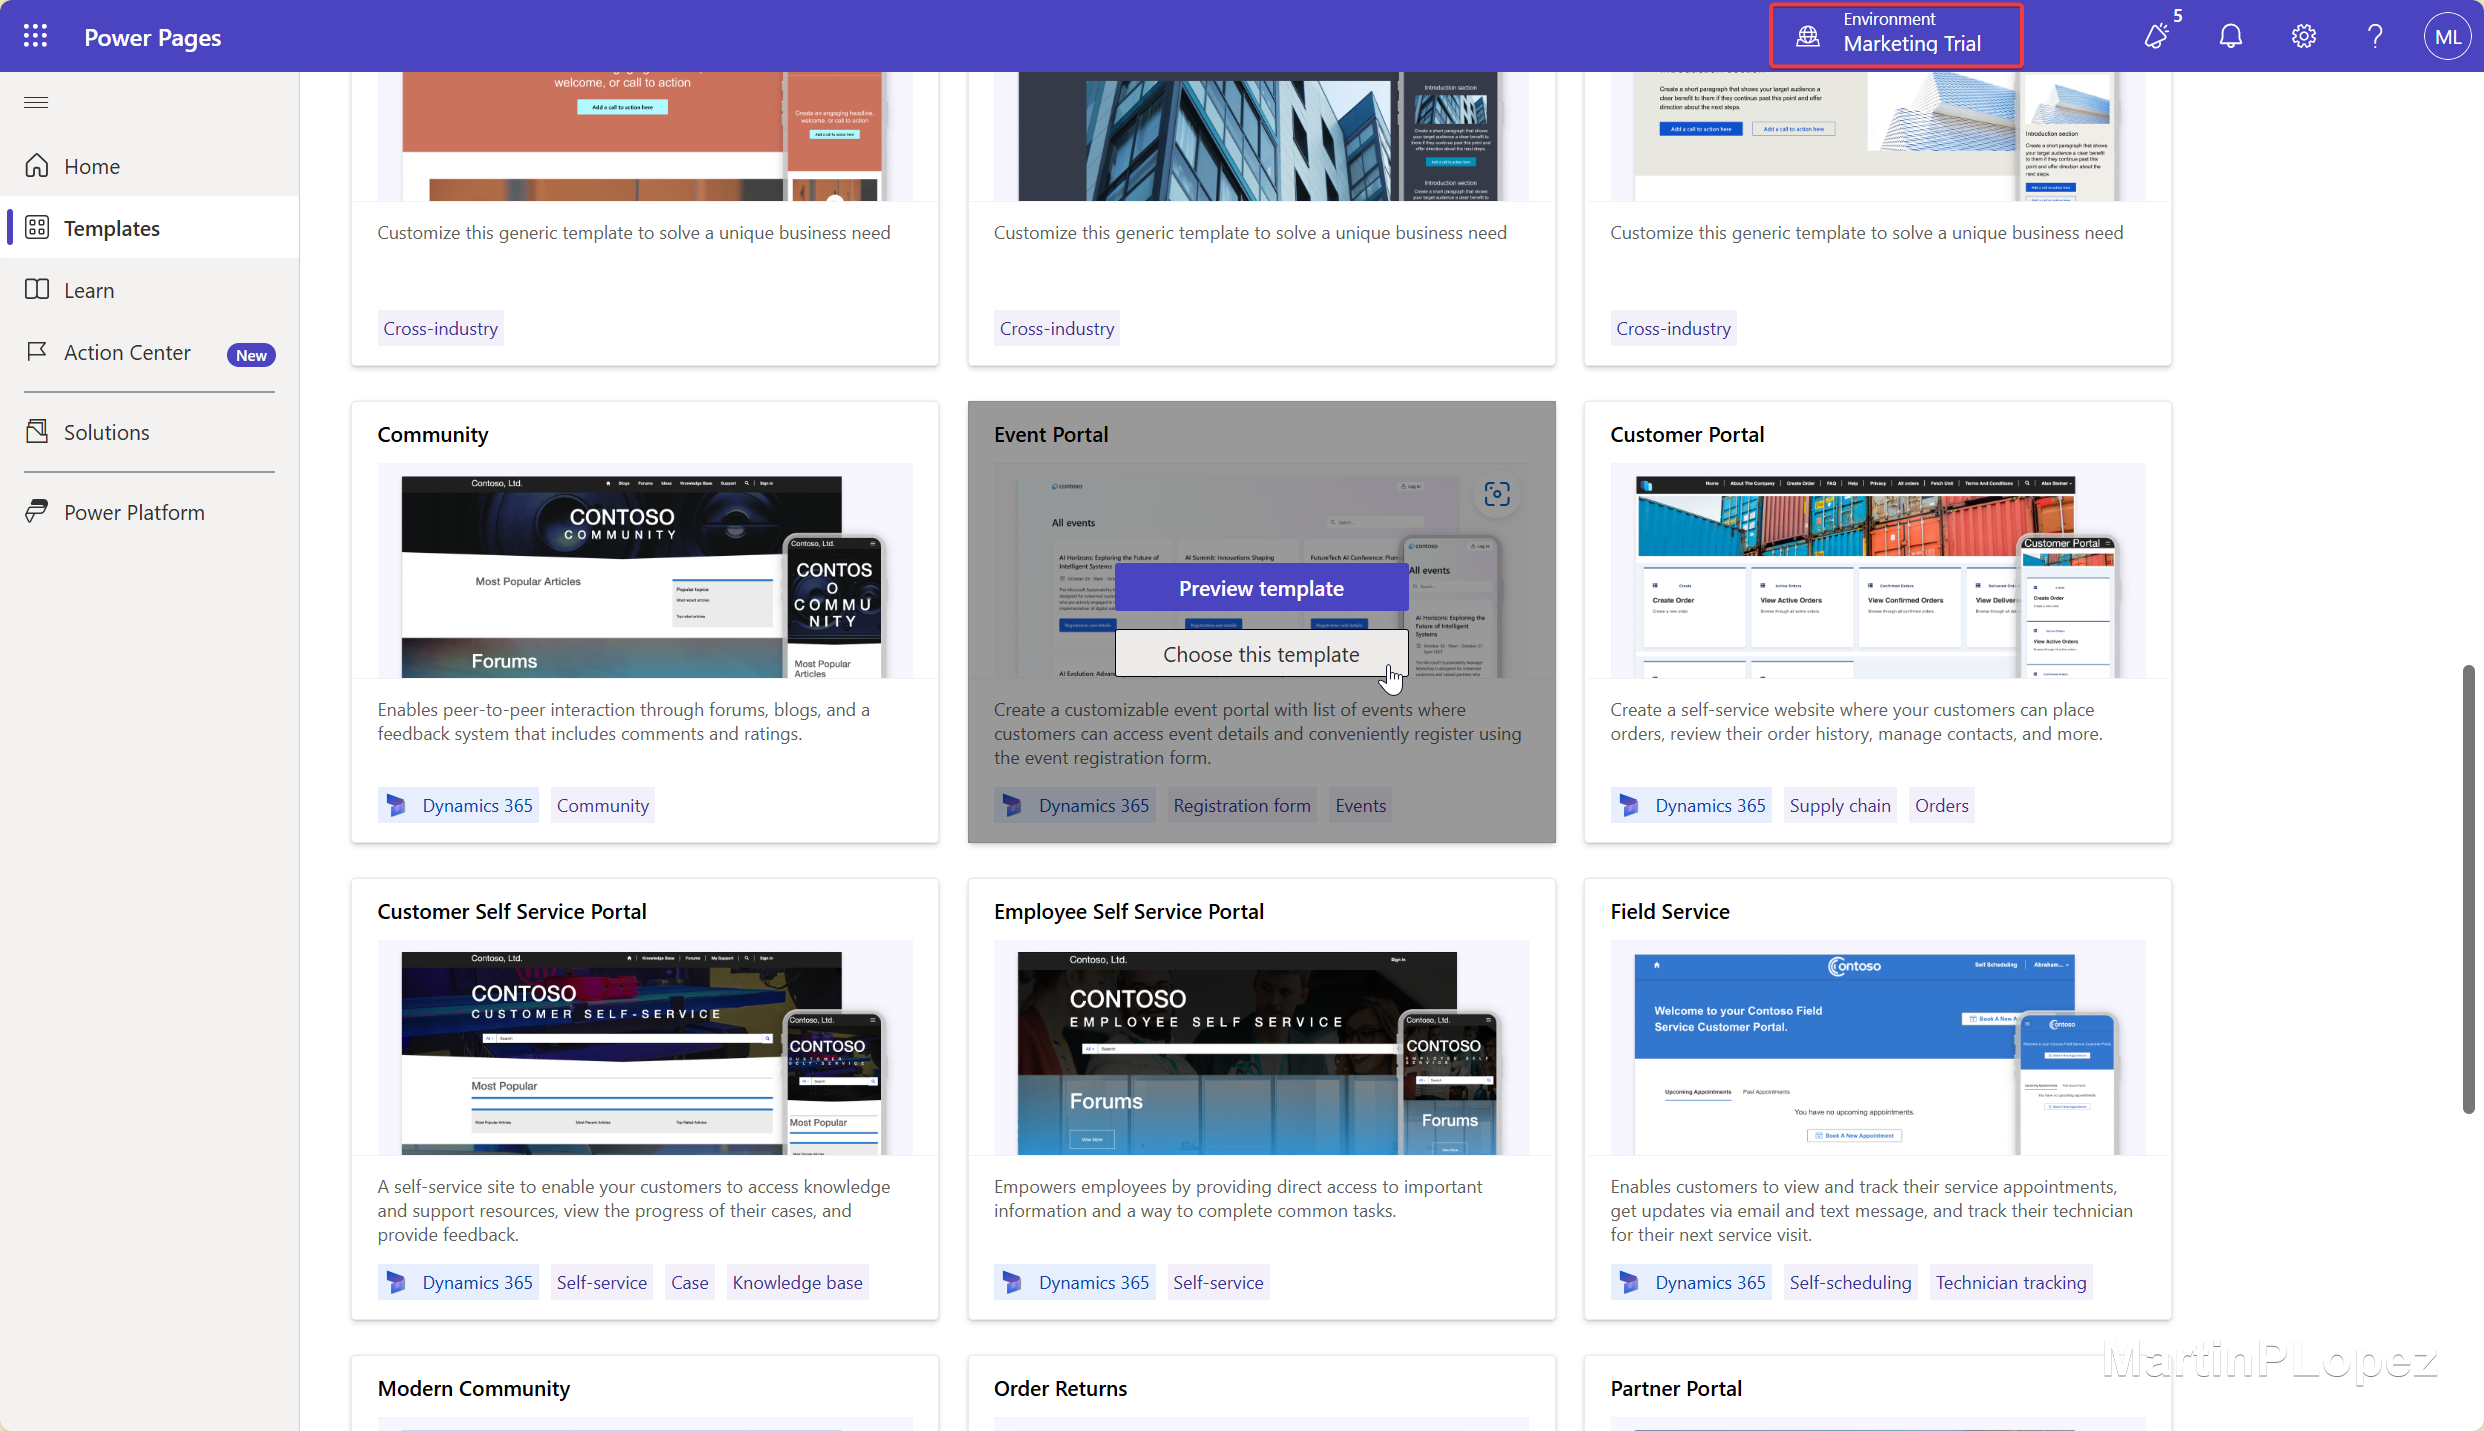
- Select the correct environment in the top-right corner.
- Select Start with a template.
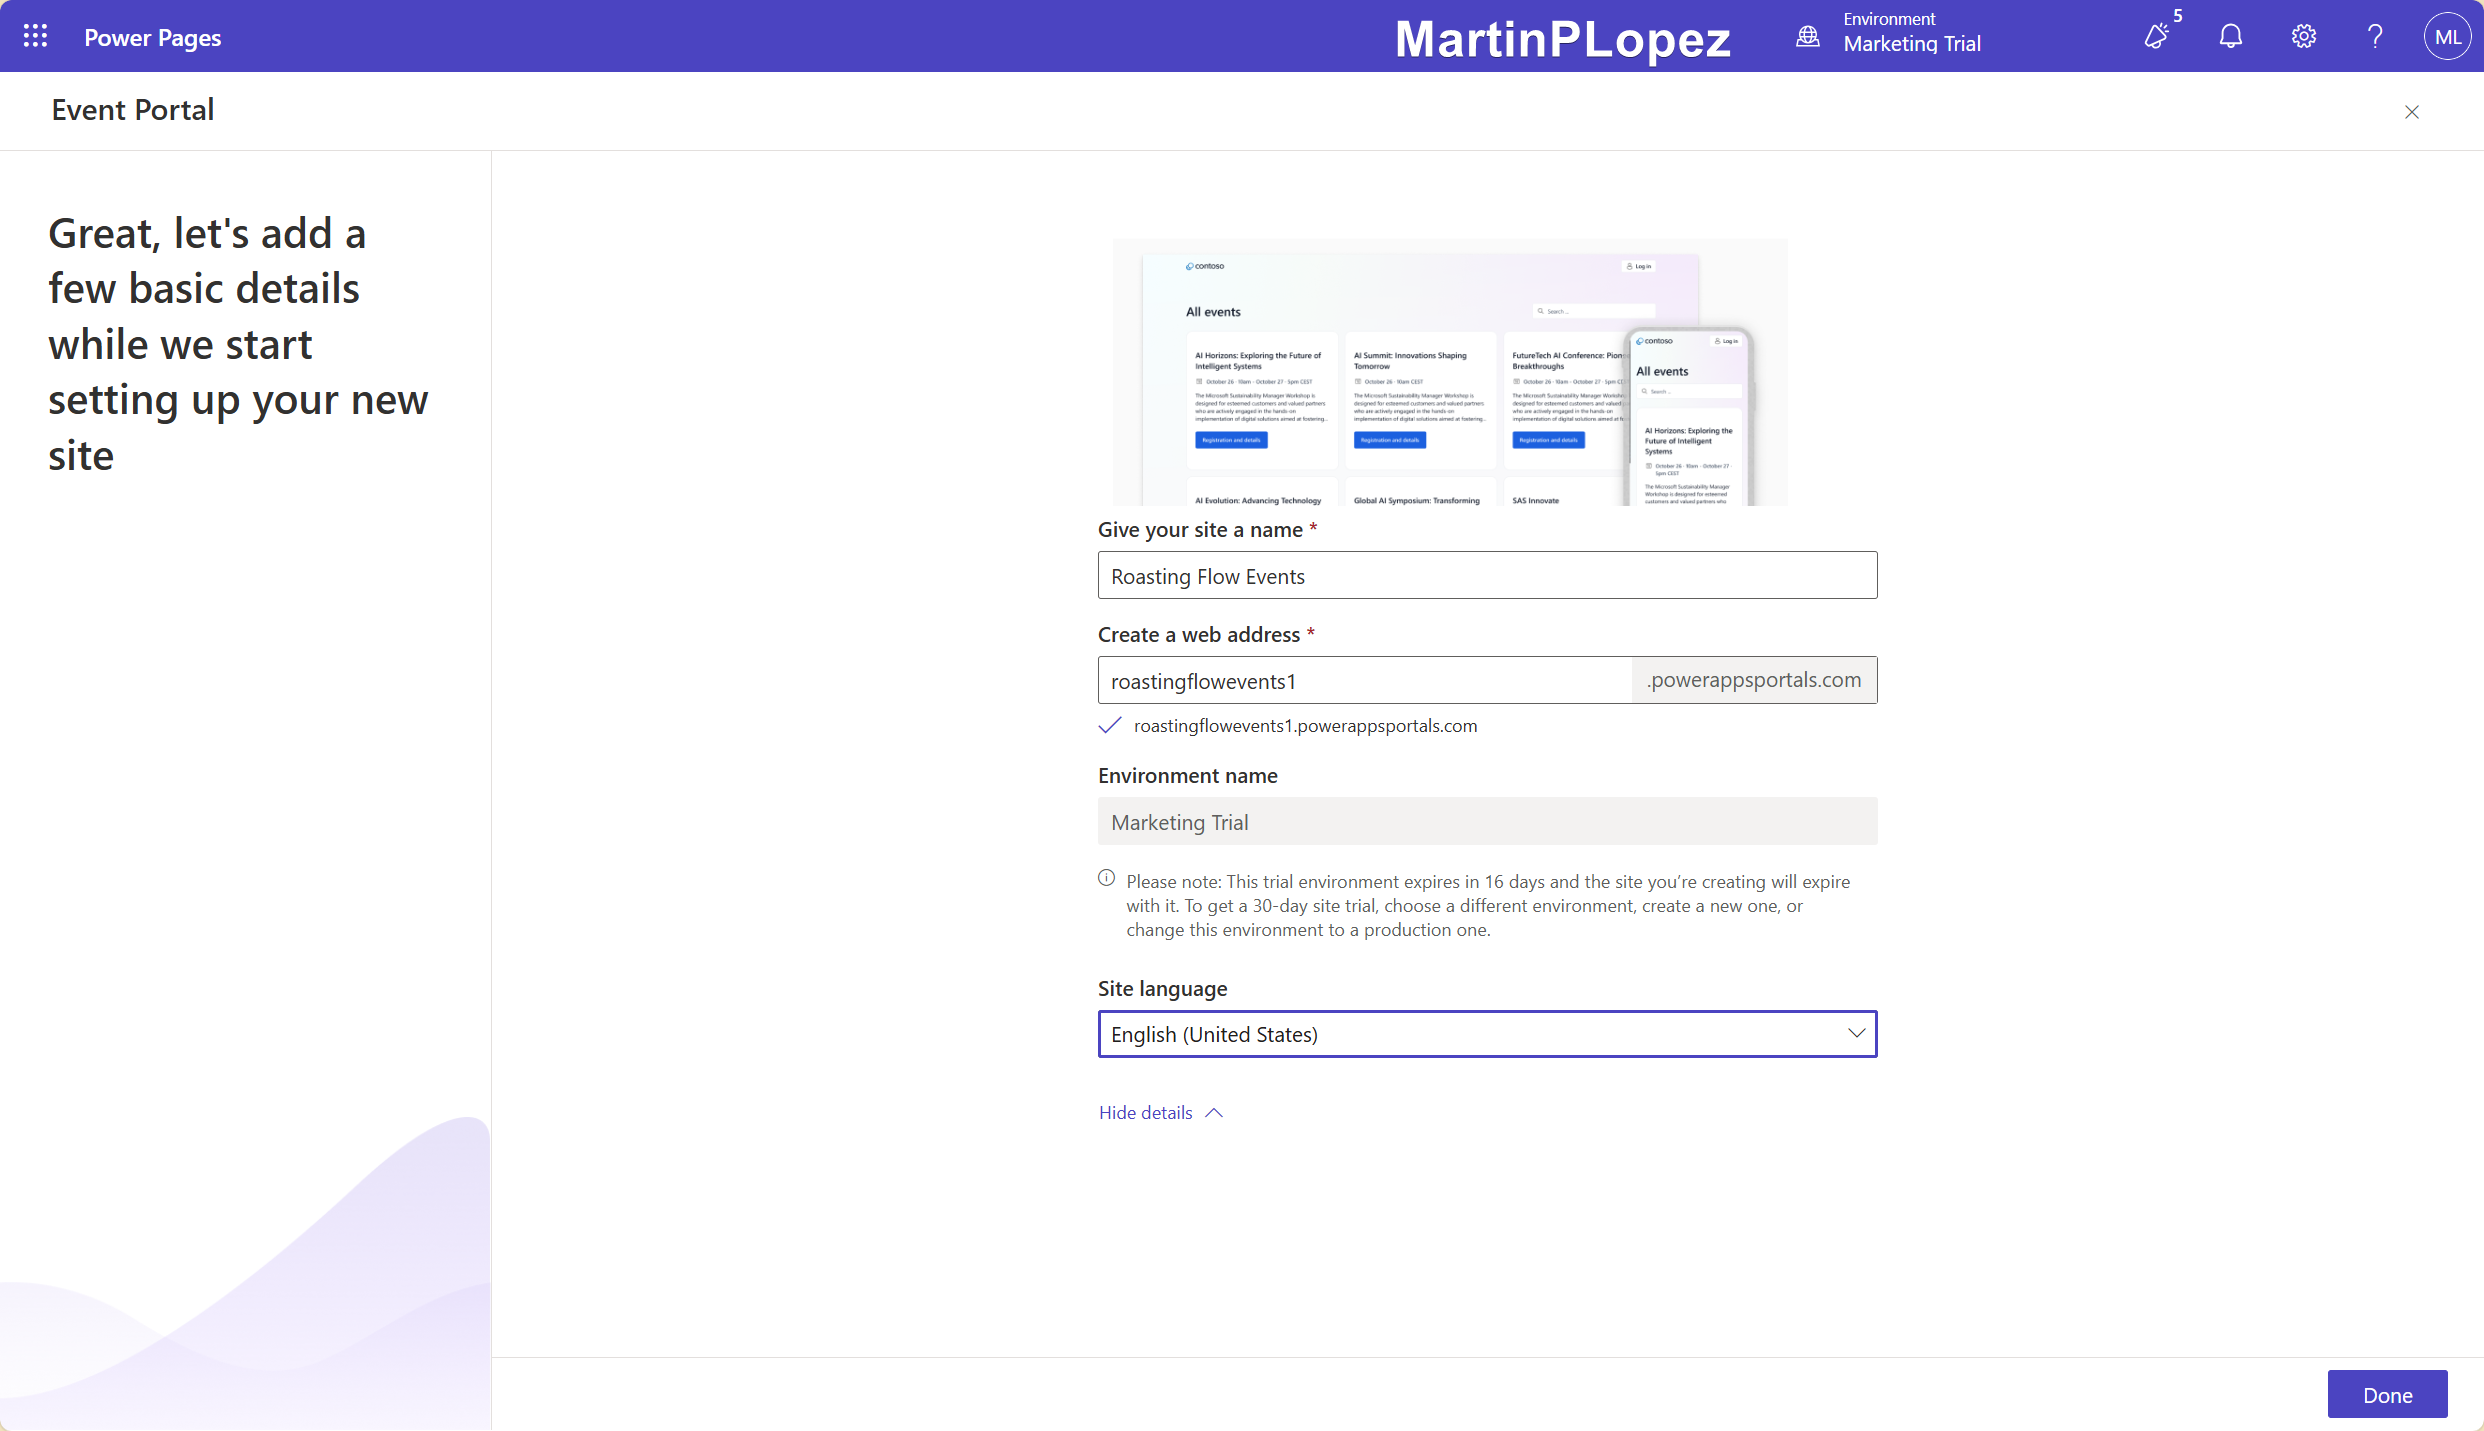
- Give your site a name and set the language.
- Select Done in the bottom-right corner.
You can change the web address later to use your own domain name. If that’s interesting for you, I’ll write a separate article on how to do it.
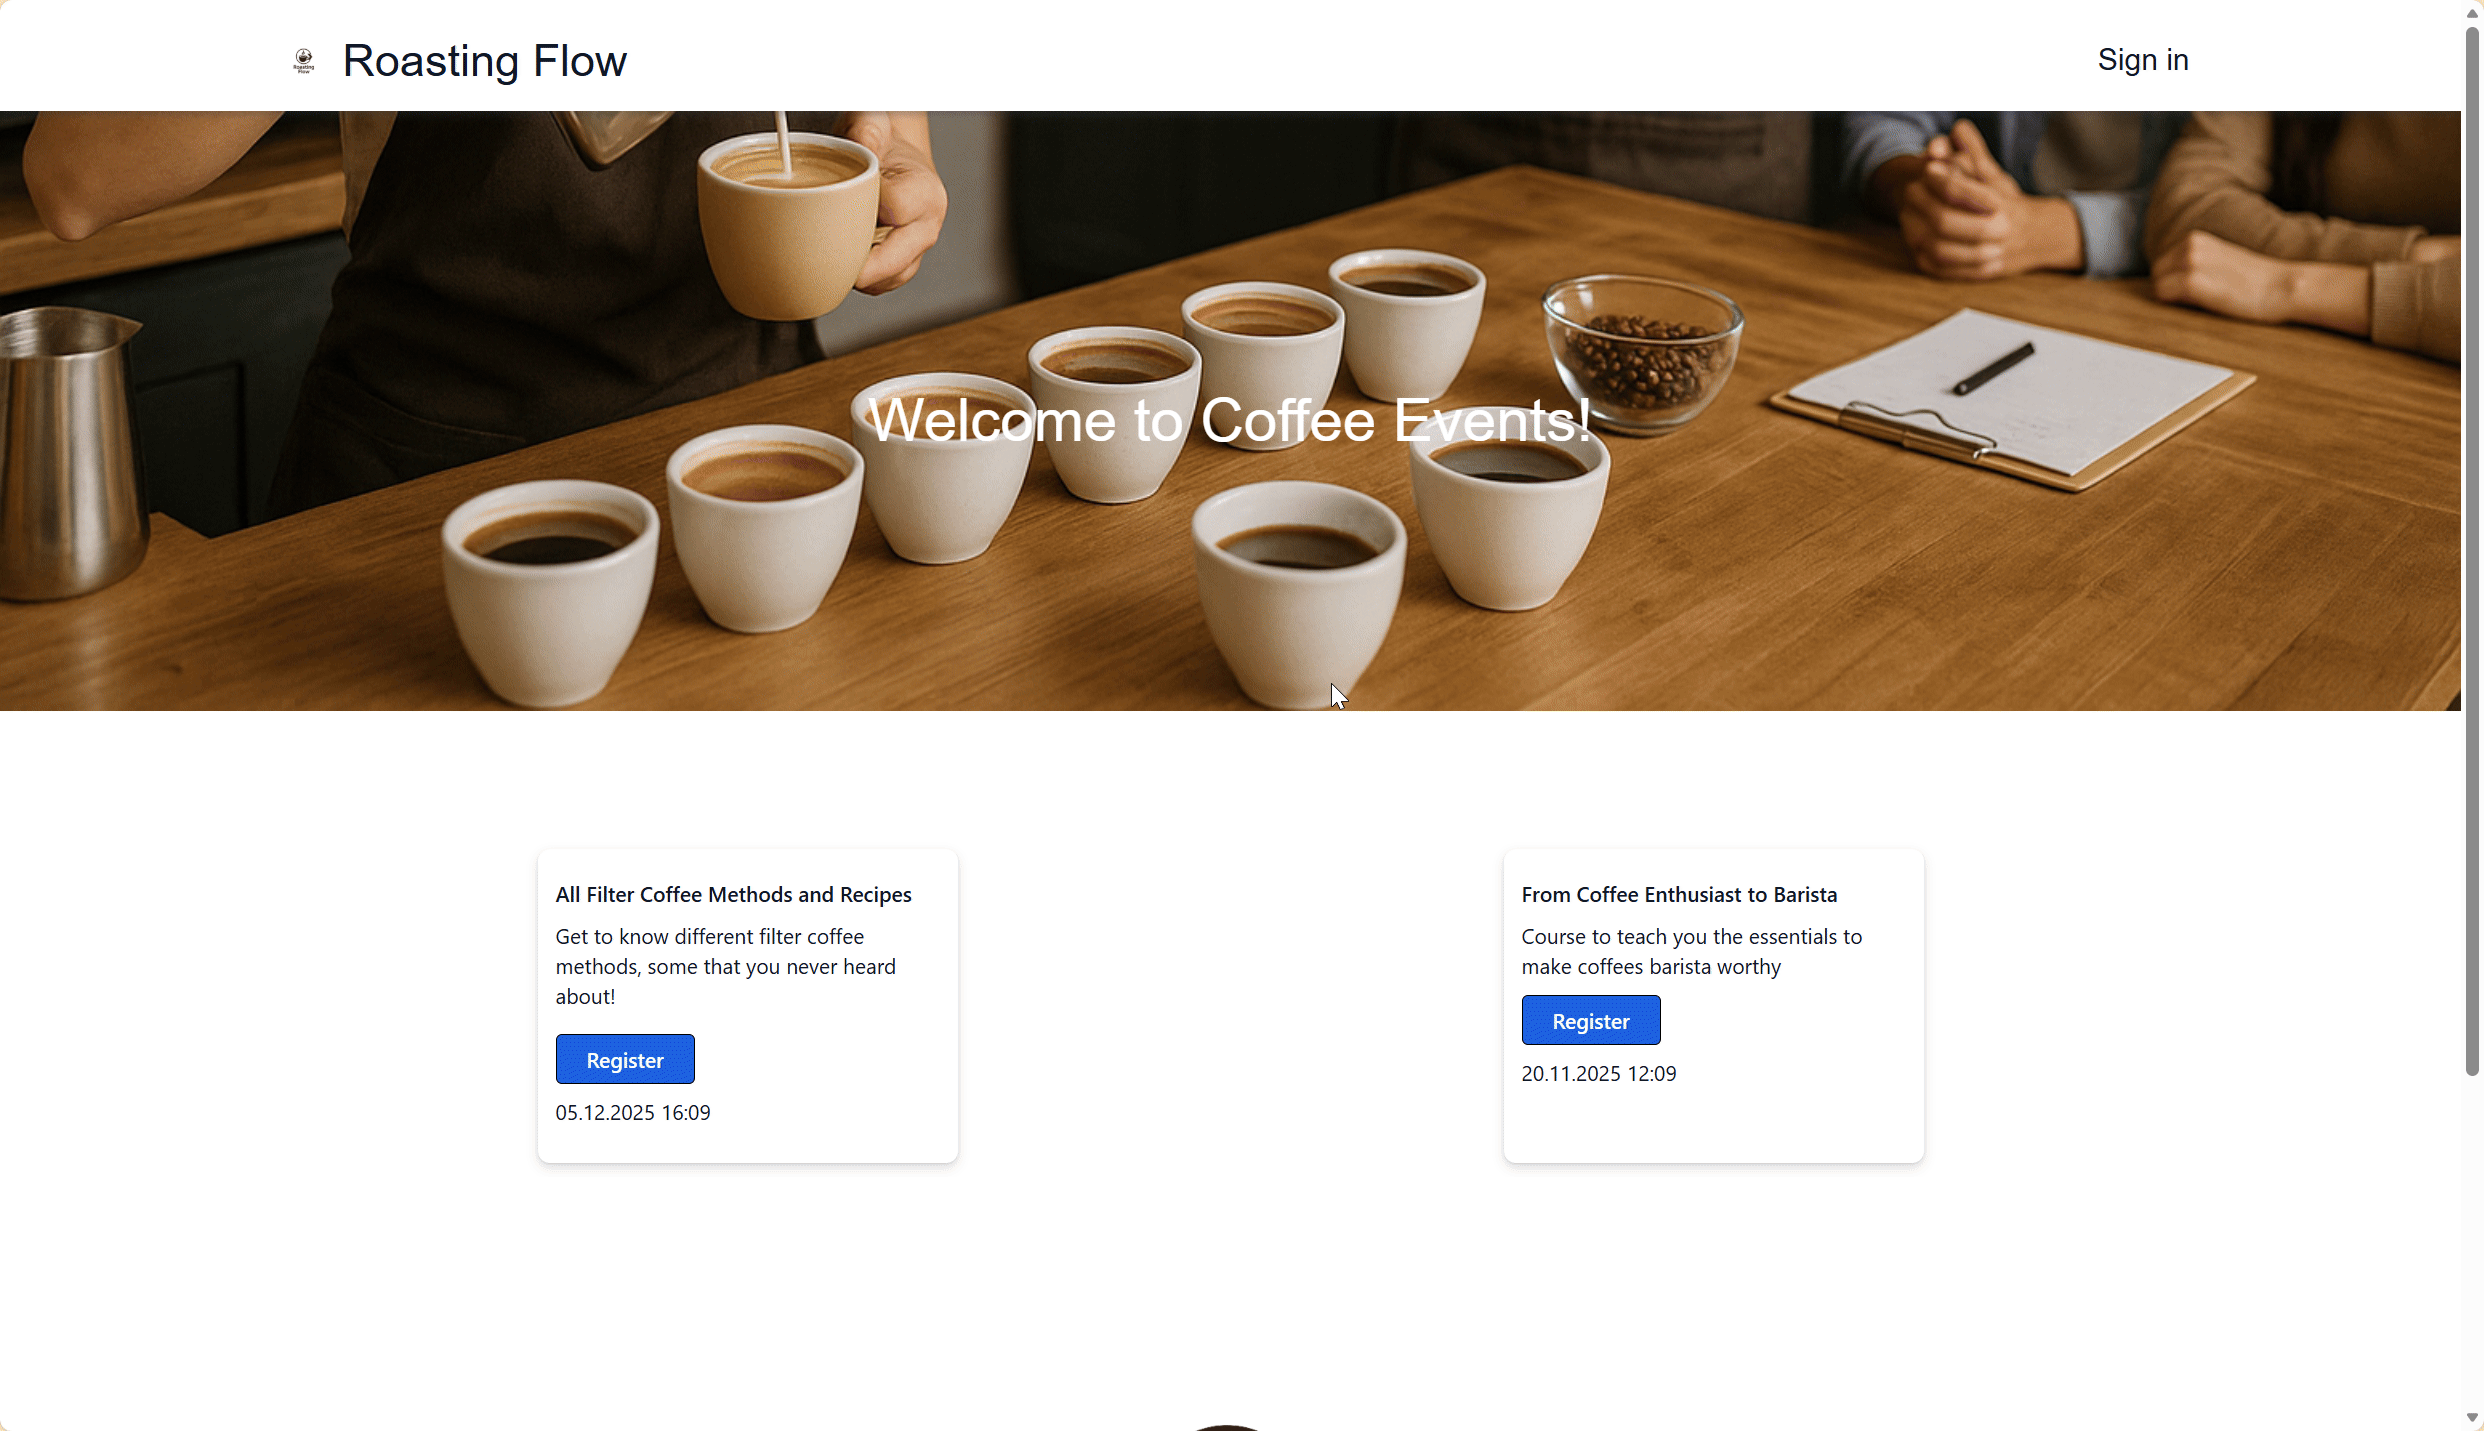
Substitute heading, cover, and logos
Now we have our website ready, but at first you might see something like this:

Give the page a refresh (Ctrl + F5 is even better) and you should see something like this:

Click Edit background to change the hero image. You can Upload Image and reuse that image later on other pages.

You can click on the title text in the hero area to edit it. This is where you tell visitors what this site is about:

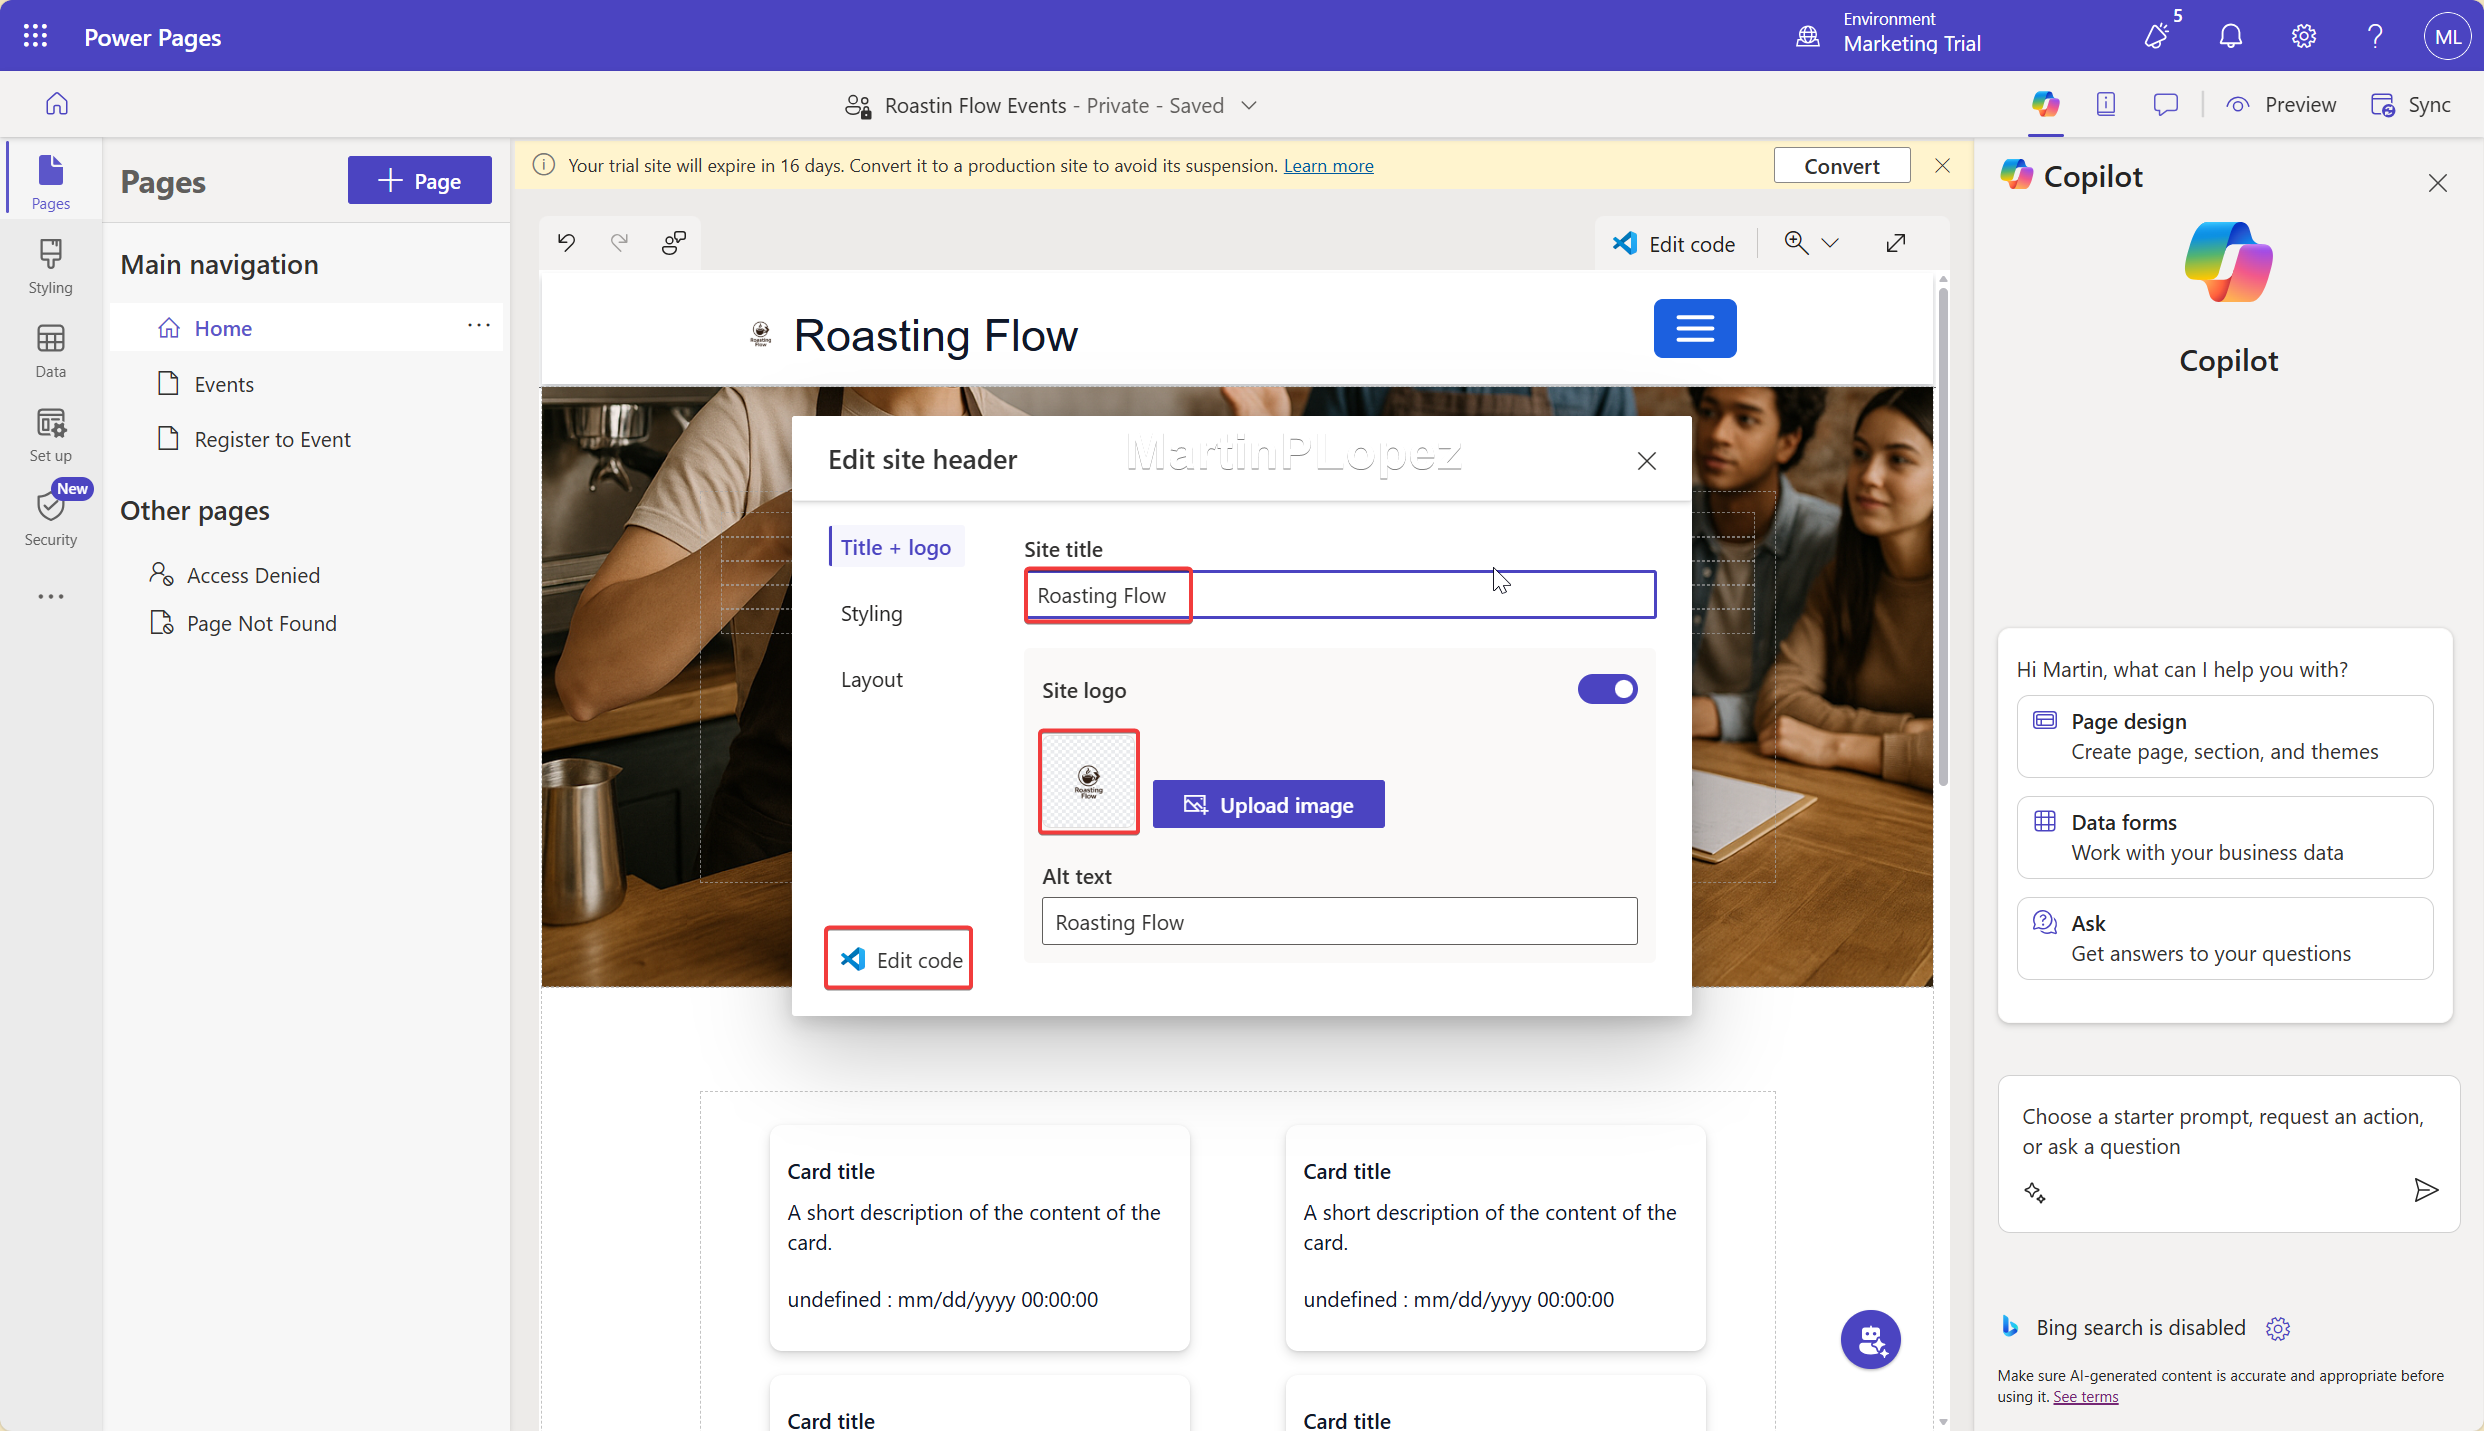
Scroll down to the footer. There, click on the Contoso logo (the standard logo) and change it to your own:

If the logo is too tall (like it was for me), you can adjust the width to whatever feels appropriate — the layout will adjust automatically while maintaining the aspect ratio.

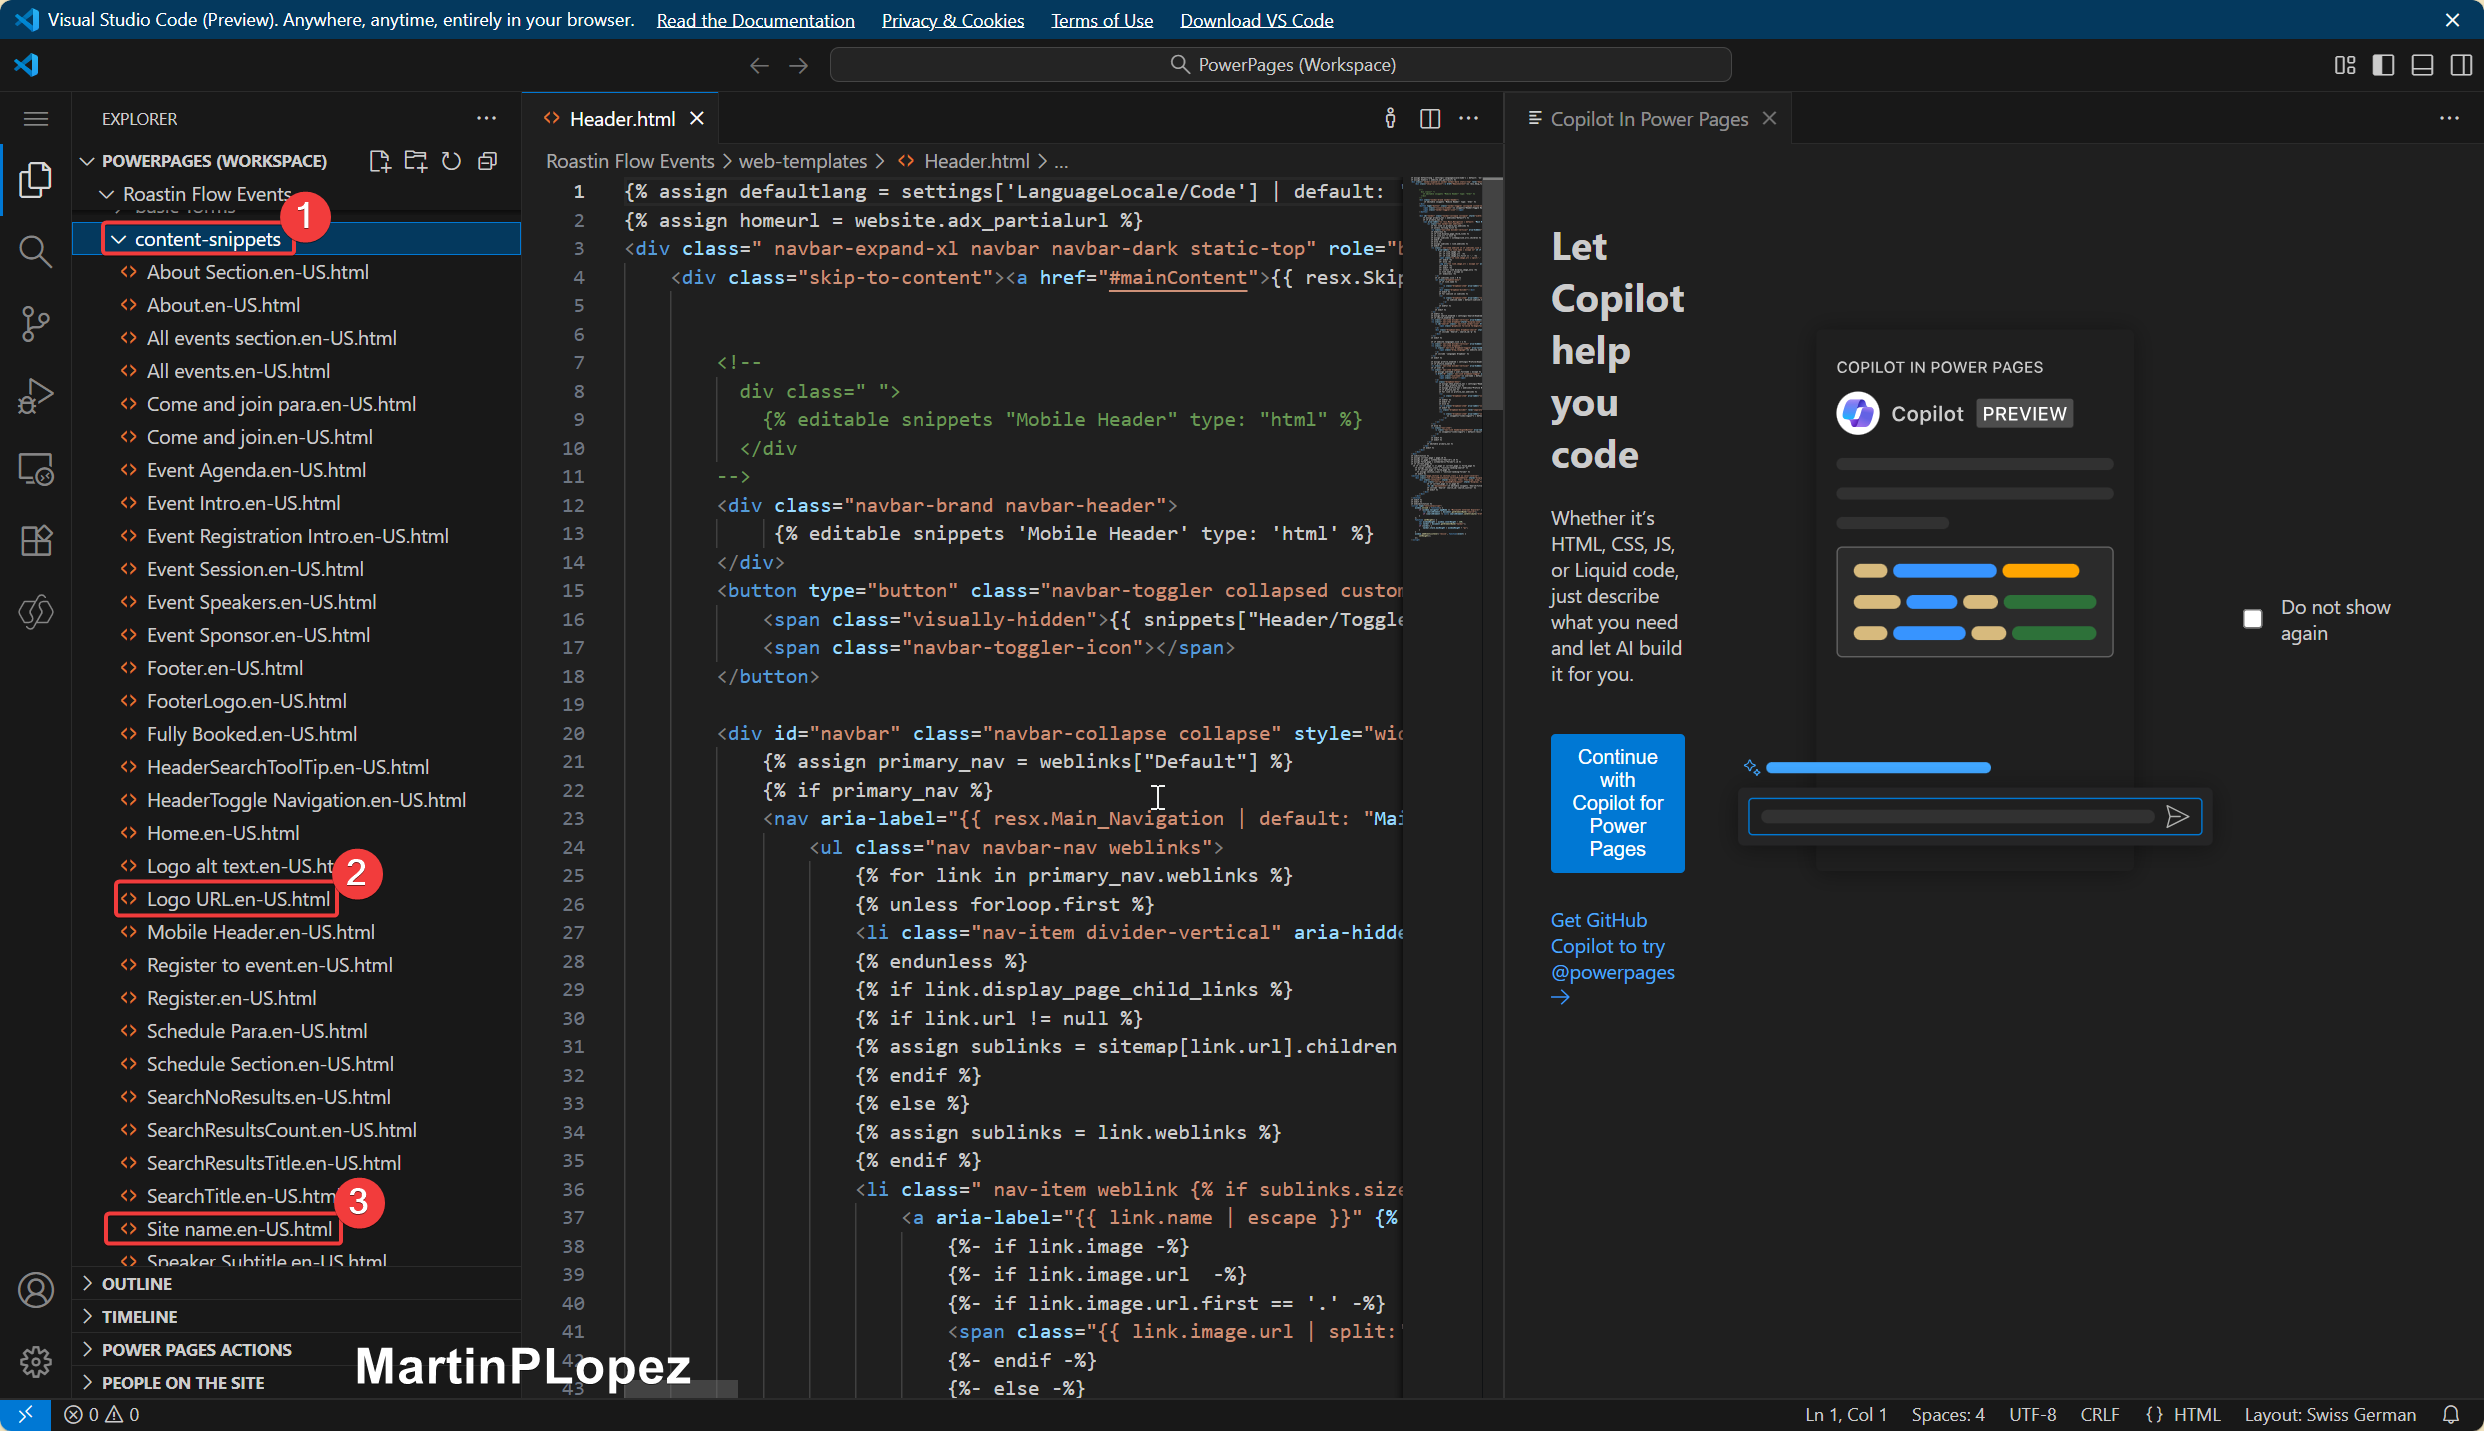
For the header, I found it easier to change the logo and site name via Edit code, because changing it only in the designer wasn’t reliable at the time of writing. This might be improved by Microsoft later, but here’s the workaround.
Click Edit code:
In Visual Studio Code, open the content snippets folder. There you’ll find:
- Logo URL (2)
- Site name (3)
In Logo URL, set the file name of the logo you uploaded (after the \). For example:
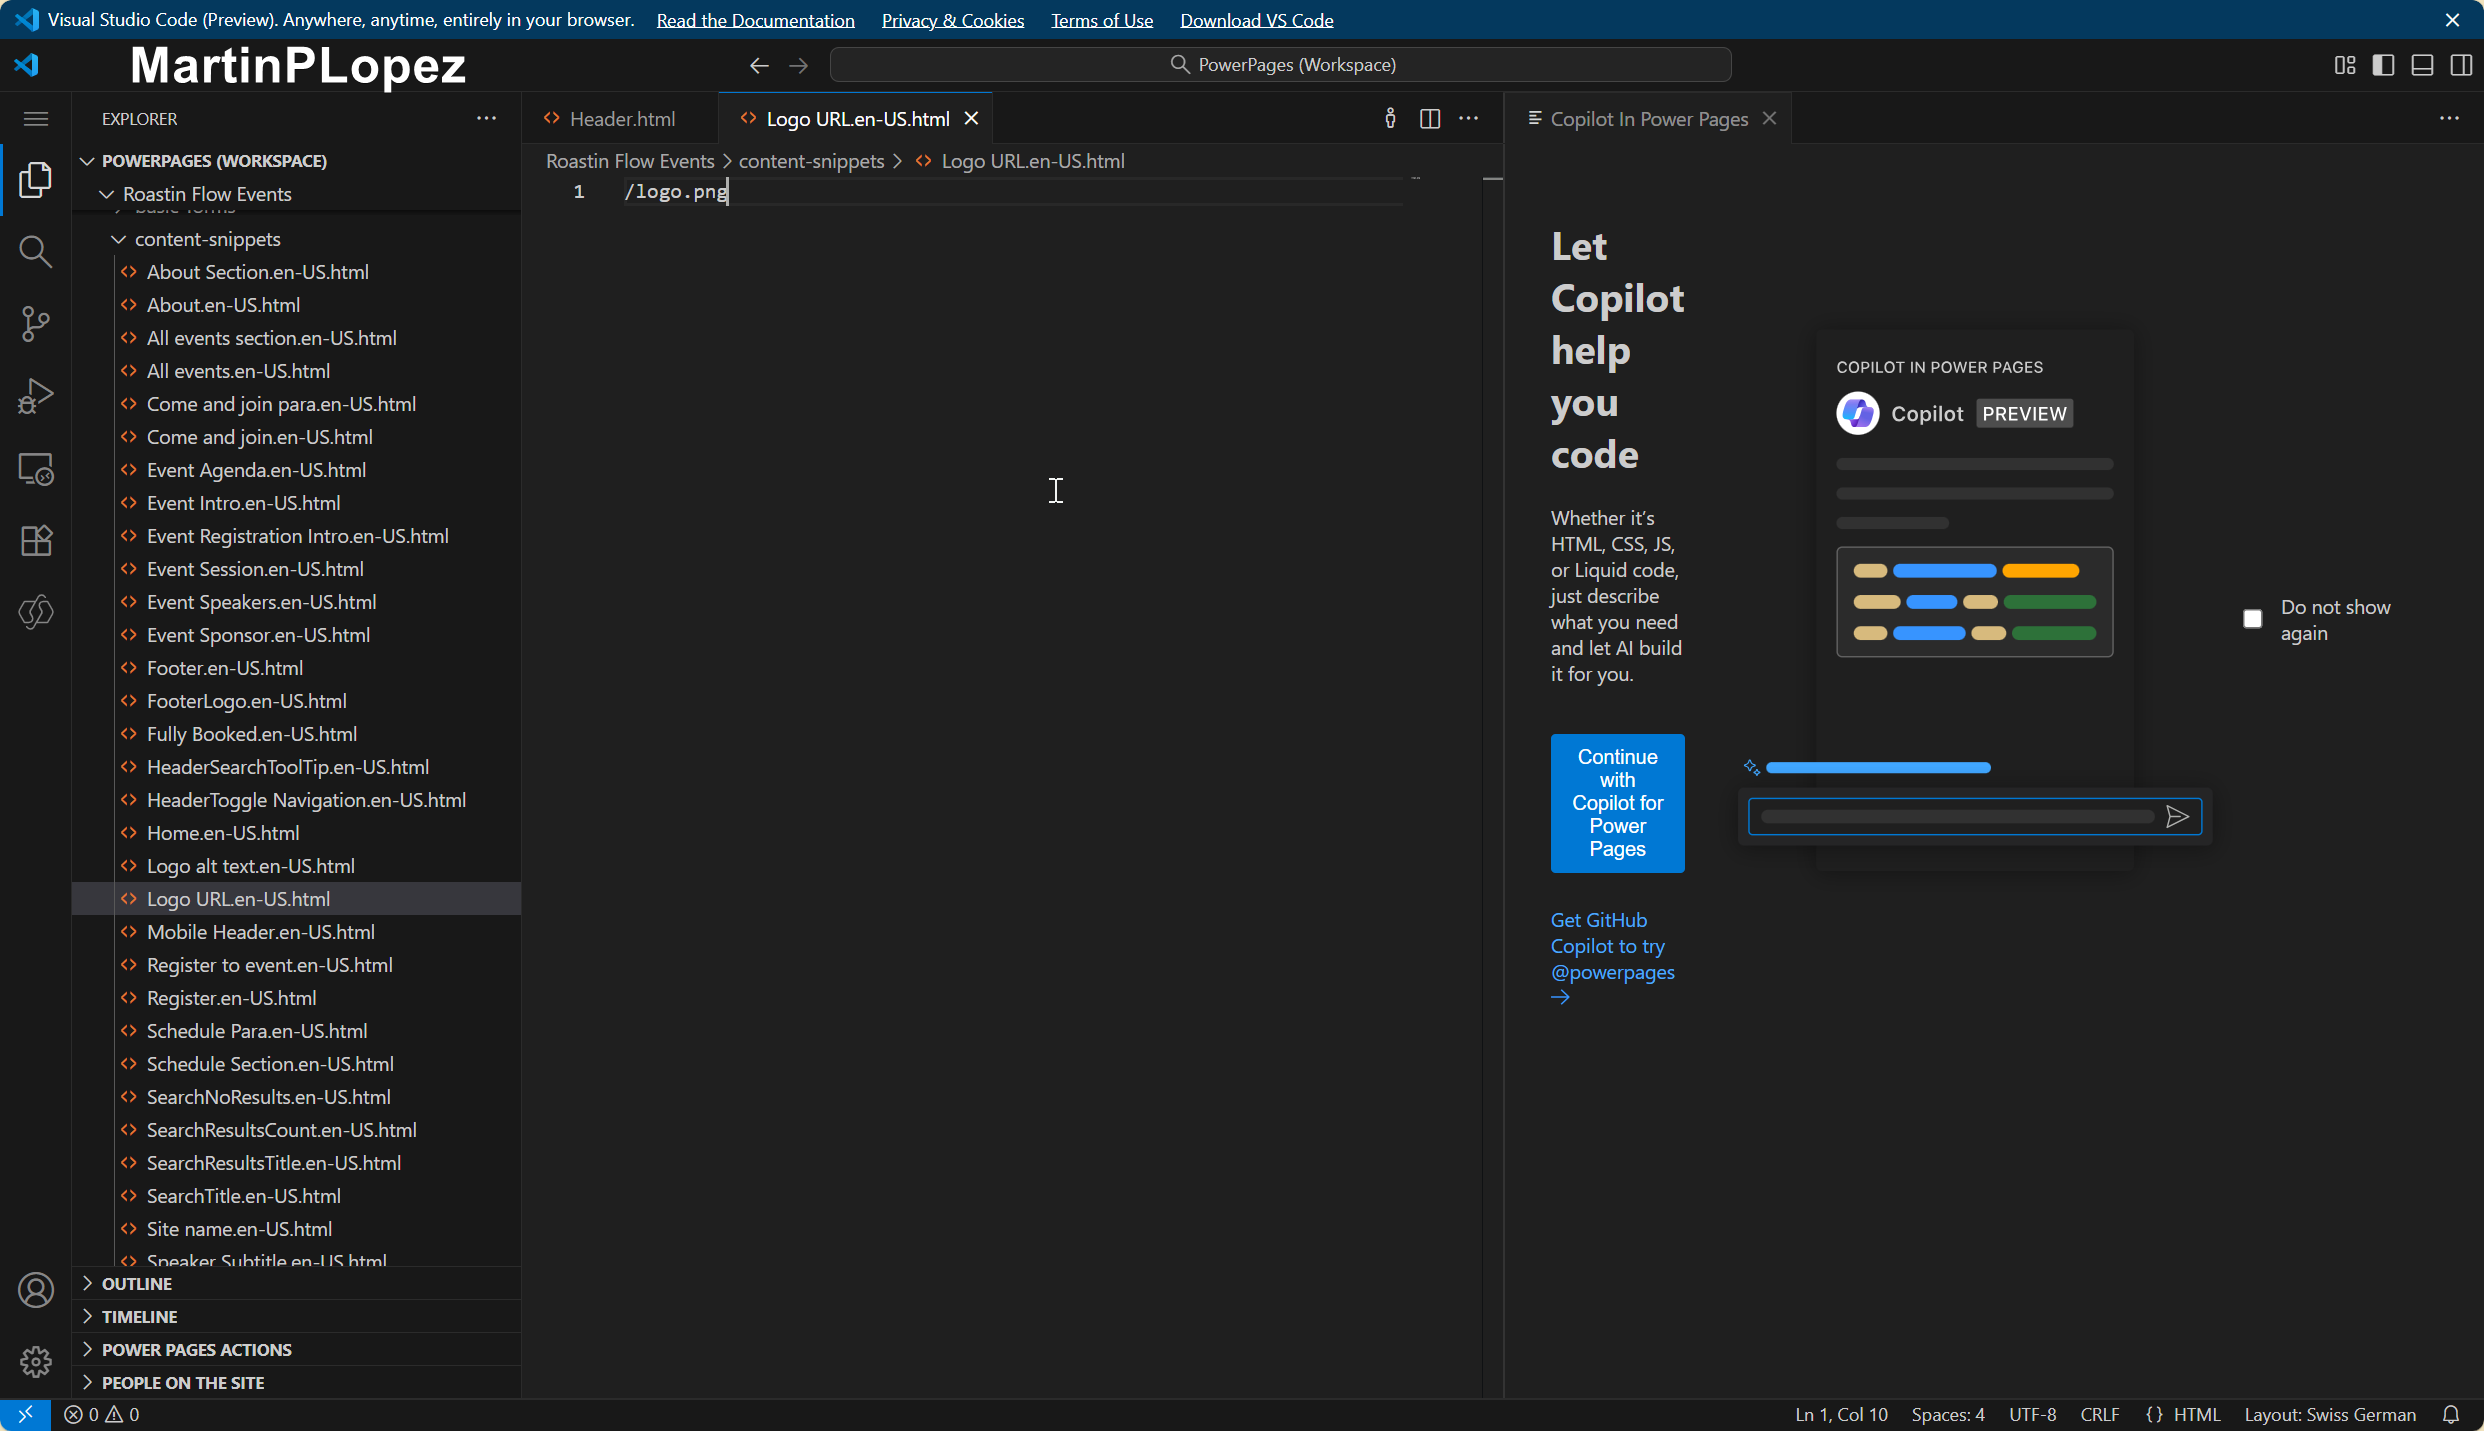
Save (Ctrl+S) and refresh your portal.
Now you have a nicely branded page!
Adapt the registration page
At the time of writing this, the default registration page in the template doesn’t always display the registration forms published in Dynamics 365 Customer Insights – Journeys correctly.
The good news: if we replace its logic with the embedding form logic from Microsoft, it works very well and is very simple. 😊
First, we need your Organization ID:
- In Power Pages, click on Settings.
- Go to Session details (or similar) and copy your Organization ID — we’ll need it shortly.

Now go back to Edit code and click Open Visual Studio Code:

In Visual Studio Code:
- Open the web pages folder.
- Inside, open the Register to Event folder.
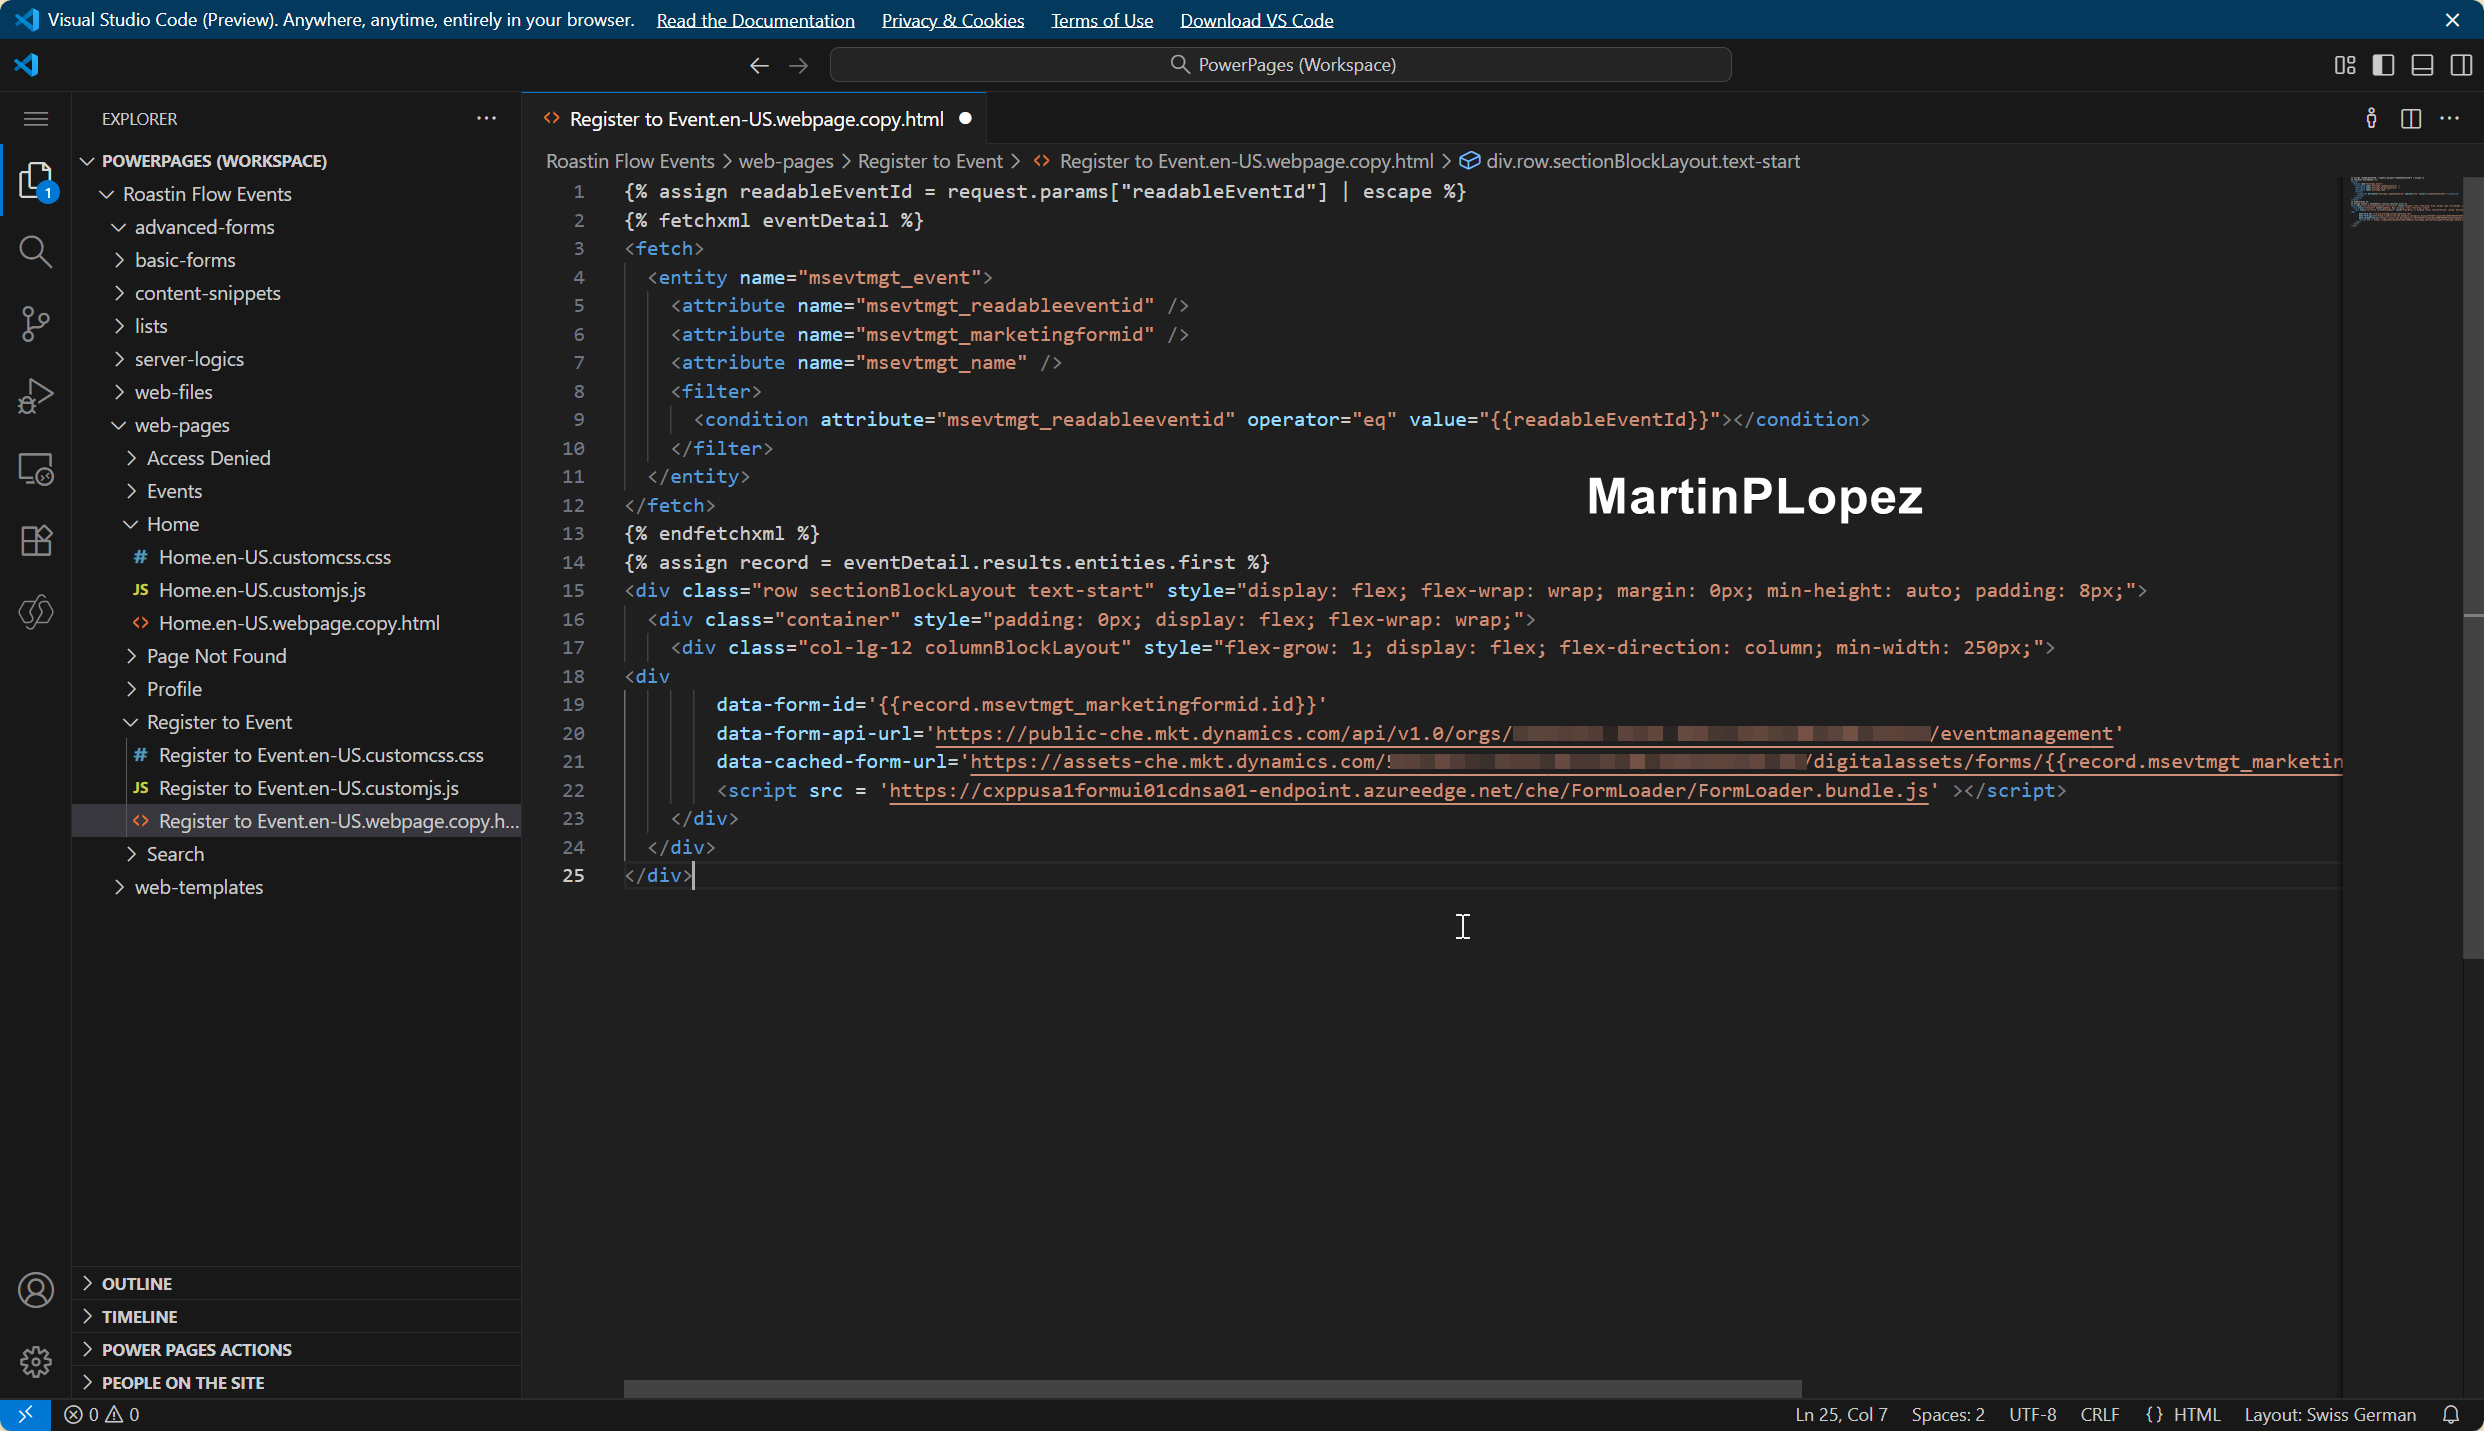
- There you’ll find the HTML file you need to edit:

We will replace the ORGANIZATIONID placeholder in the following code with your actual Organization ID.
💡 Note: the
chepart of the URLs below depends on your region. Use the URLs from the form embedding snippet generated in your own environment if they differ. For more Info for your region: Microsoft Power Platform Datacenter regions.
{% assign readableEventId = request.params["readableEventId"] | escape %}
{% fetchxml eventDetail %}
<fetch>
  <entity name="msevtmgt_event">
    <attribute name="msevtmgt_readableeventid" />
    <attribute name="msevtmgt_marketingformid" />
    <attribute name="msevtmgt_name" />
    <filter>
      <condition attribute="msevtmgt_readableeventid" operator="eq" value="{{readableEventId}}"></condition>
    </filter>
  </entity>
</fetch>
{% endfetchxml %}
{% assign record = eventDetail.results.entities.first %}
<div class="row sectionBlockLayout text-start" style="display: flex; flex-wrap: wrap; margin: 0px; min-height: auto; padding: 8px;">
  <div class="container" style="padding: 0px; display: flex; flex-wrap: wrap;">
    <div class="col-lg-12 columnBlockLayout" style="flex-grow: 1; display: flex; flex-direction: column; min-width: 250px;">
      <div
        data-form-id='{{record.msevtmgt_marketingformid.id}}'
        data-form-api-url='https://public-che.mkt.dynamics.com/api/v1.0/orgs/ORGANIZATIONID/eventmanagement'
        data-cached-form-url='https://assets-che.mkt.dynamics.com/ORGANIZATIONID/digitalassets/forms/{{record.msevtmgt_marketingformid.id}}'
        data-readable-event-id='{{readableEventId}}'>
      </div>
      <script src='https://cxppusa1formui01cdnsa01-endpoint.azureedge.net/che/FormLoader/FormLoader.bundle.js'></script>
    </div>
  </div>
</div>
Delete the old HTML content of the Register to Event page and paste this code in its place (with your Organization ID and correct region). It should look similar to this:
Save your changes.
Now, when visitors open the registration page for an event, the embedded Customer Insights – Journeys form will load correctly.
Adapt home cards to events
Back in the Power Pages designer, you can adapt the cards on the home page to display your event information.
You can:
- Choose a different layout
- Select which event fields to display
- Adjust the list to show only upcoming events

This is where you turn the template into your event showcase.
Make the portal public
When the portal is ready to go public:
- Go to the top of the designer and click on the site title.
- Select Manage site visibility.

Choose Public and confirm. This will allow people (outside your organization) to access the site and register for your events.

2. Set up the portal in Dynamics 365 Customer Insights – Journeys
We also need a bit of setup on the Dynamics side to connect your new Power Pages site to Events in Customer Insights – Journeys.
Add the domain
We need to validate our domain for external form hosting. This is required so the forms from Customer Insights – Journeys can load in a registered domain.
The good news: you don’t need to touch DNS or add records manually.
- In Customer Insights – Journeys, go to Settings → Domains.
- Create a new domain.
- In the form that opens, provide your Power Pages URL (the site you just created).
If you’re unsure about the URL, go back to the Power Pages designer and click Preview in the top-right corner — copy that URL.
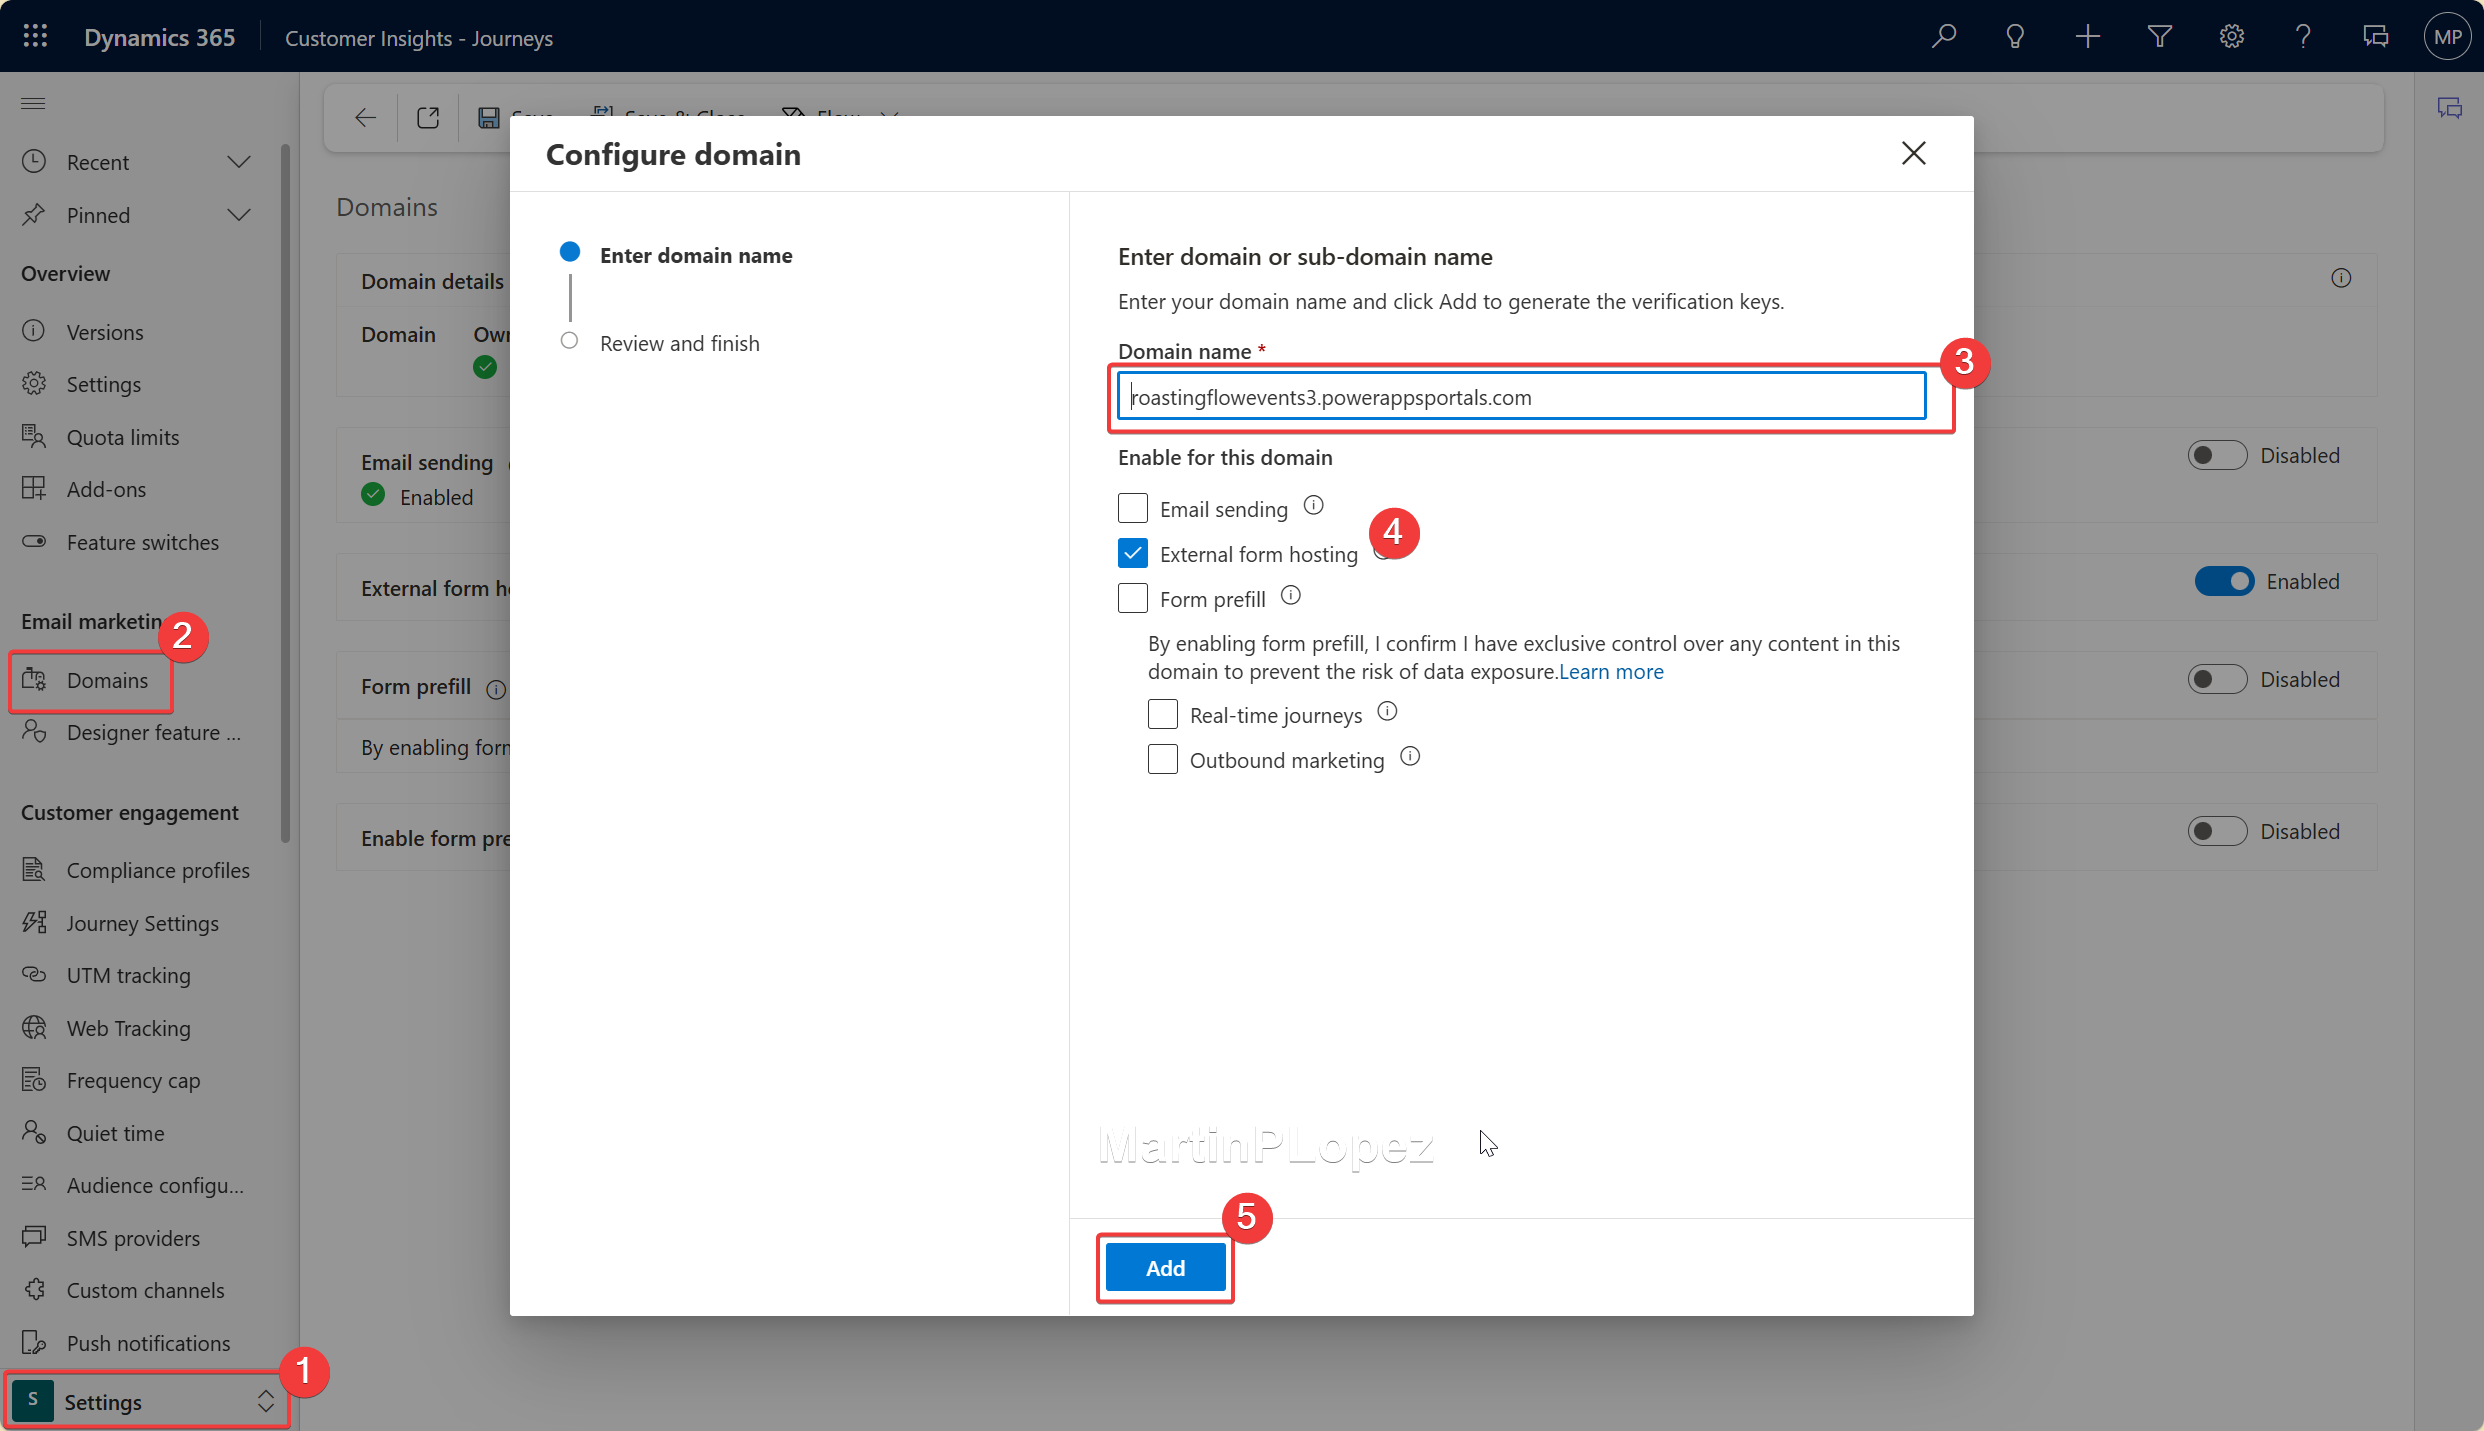
Click Next, then Verify, then Done. This should be automatic because the host of this webpage is Microsoft.
Add the Power Pages website
Now we’ll link the website itself.
- Go to Settings again.
- Under Event management, open Power Pages websites.
- Add your newly created site.
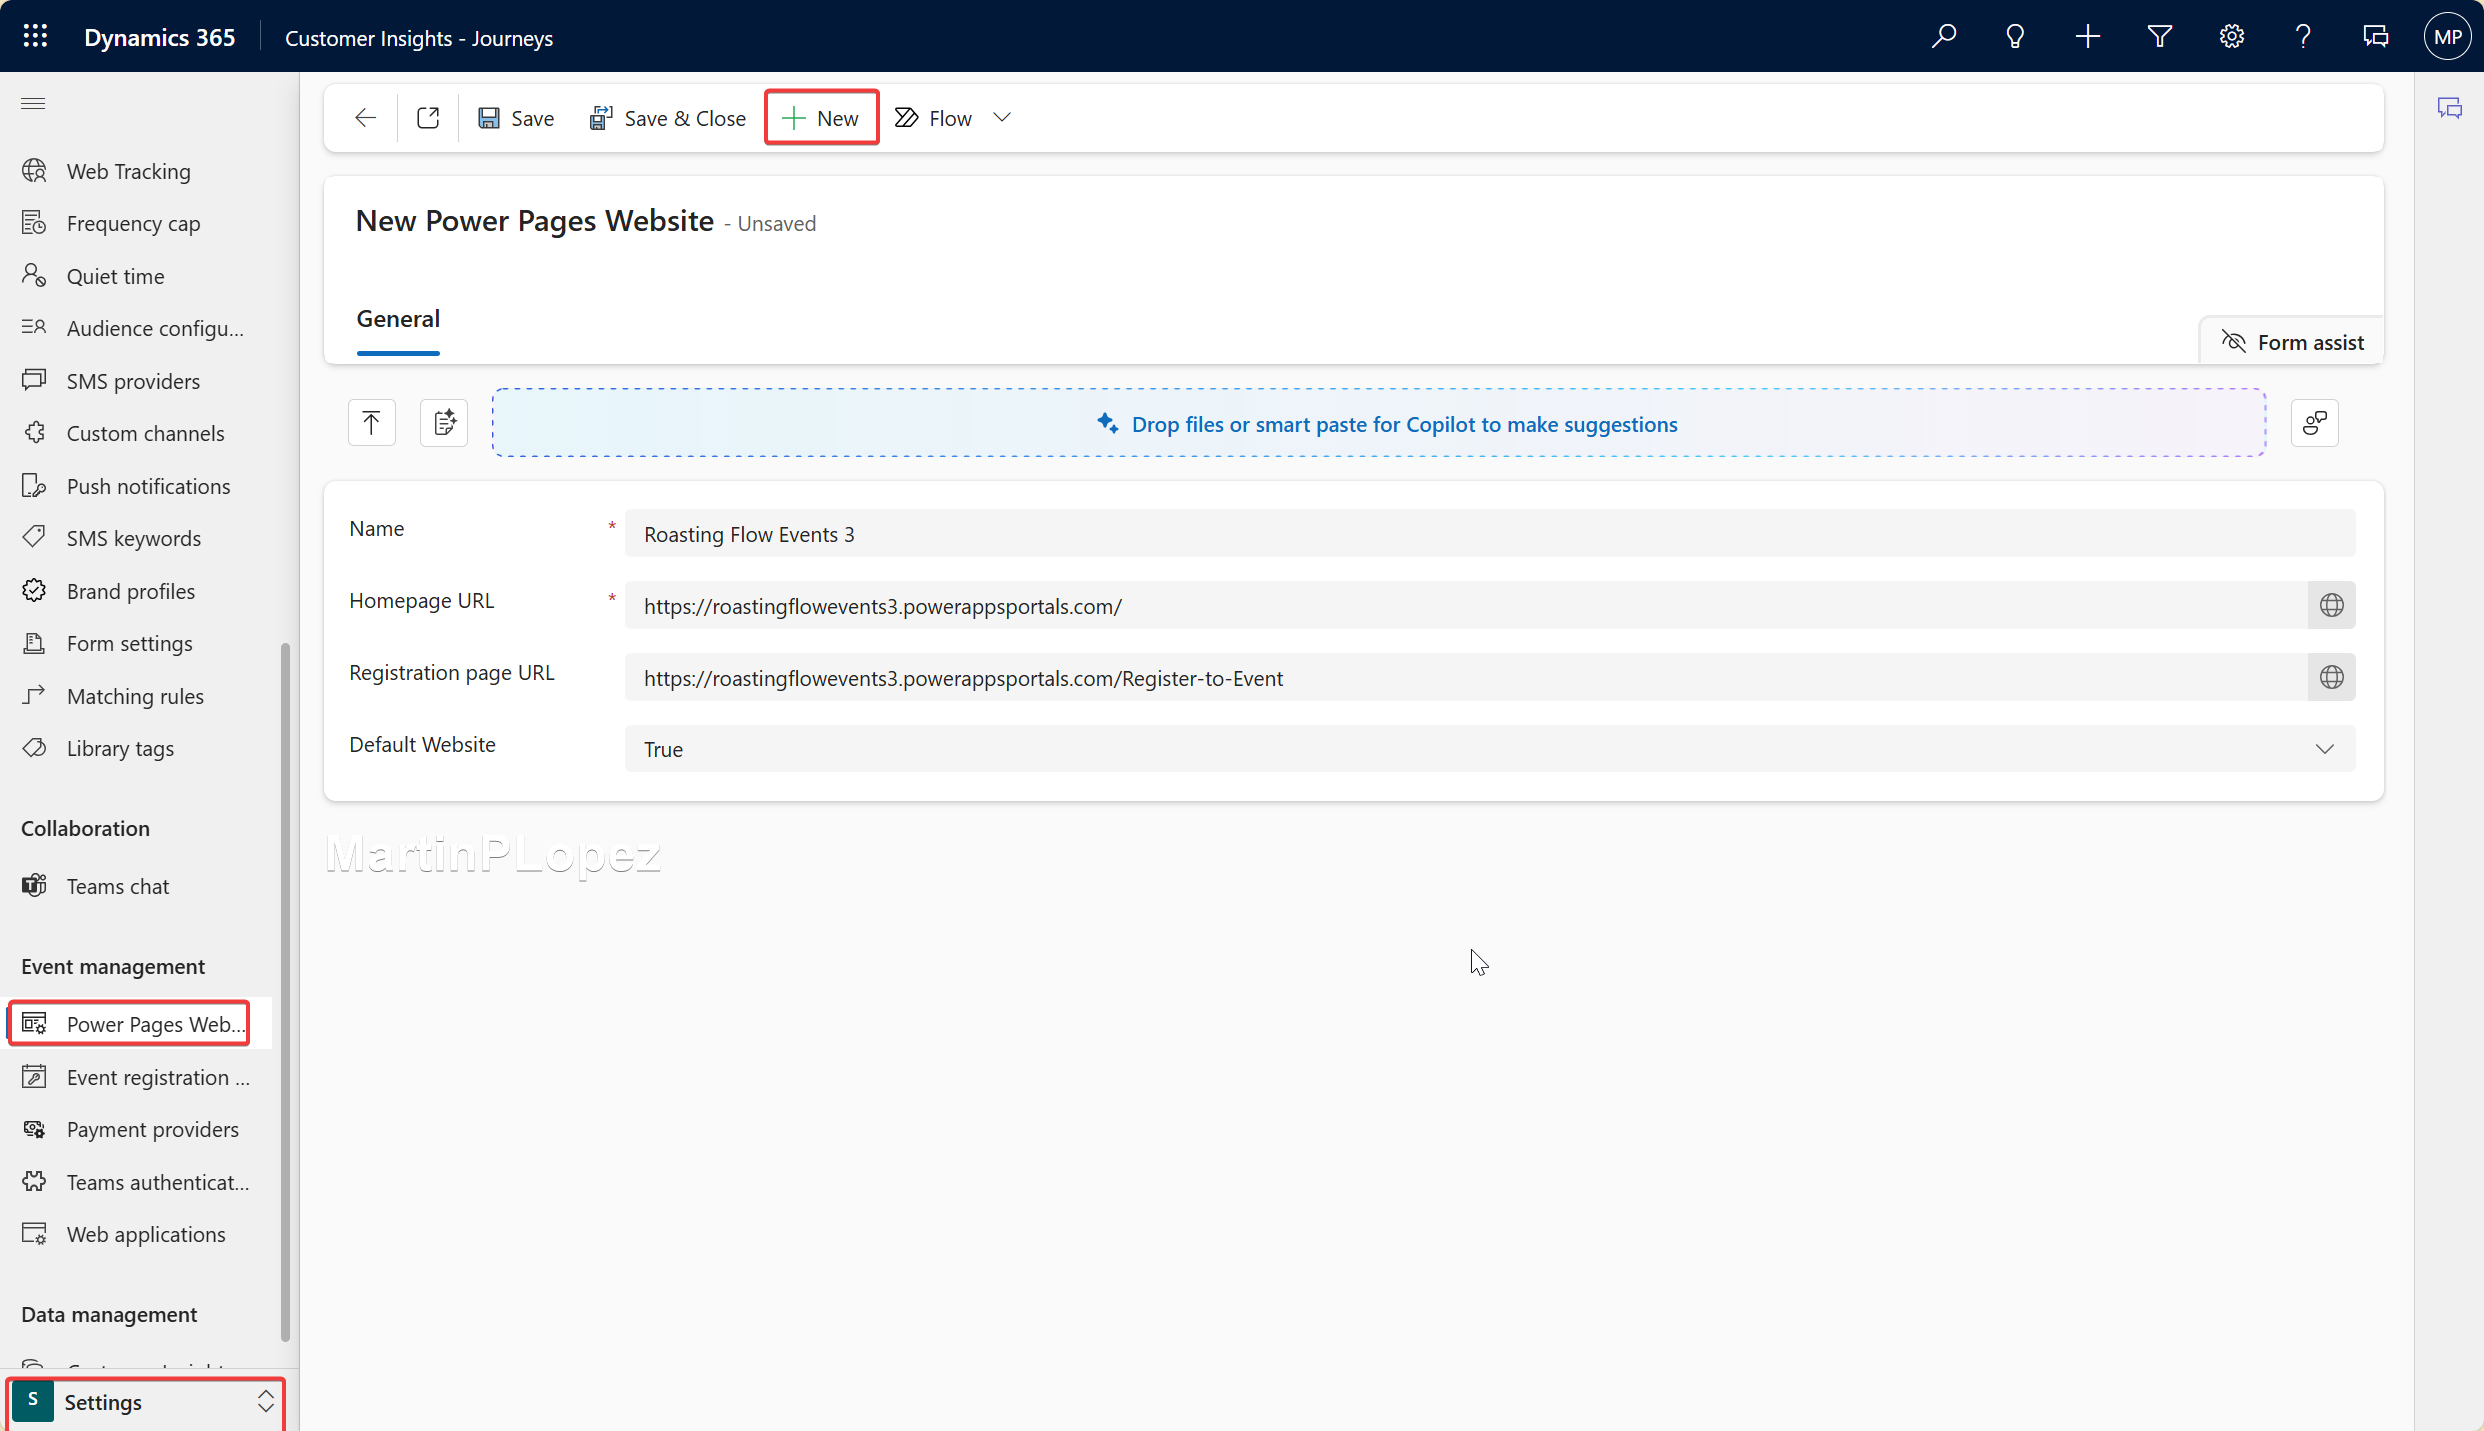
Make sure the Registration page URL points to your Power Pages site plus /Register-to-Event.
Create an event and publish it to the Power Page
Now for the fun part — try creating an event.
- Create a new Event in Customer Insights – Journeys.
- When it’s ready, in Where do you want attendees to register for this event?, select Event portal using Power Pages.
- If it doesn’t automatically select your portal, choose it manually from the lookup.
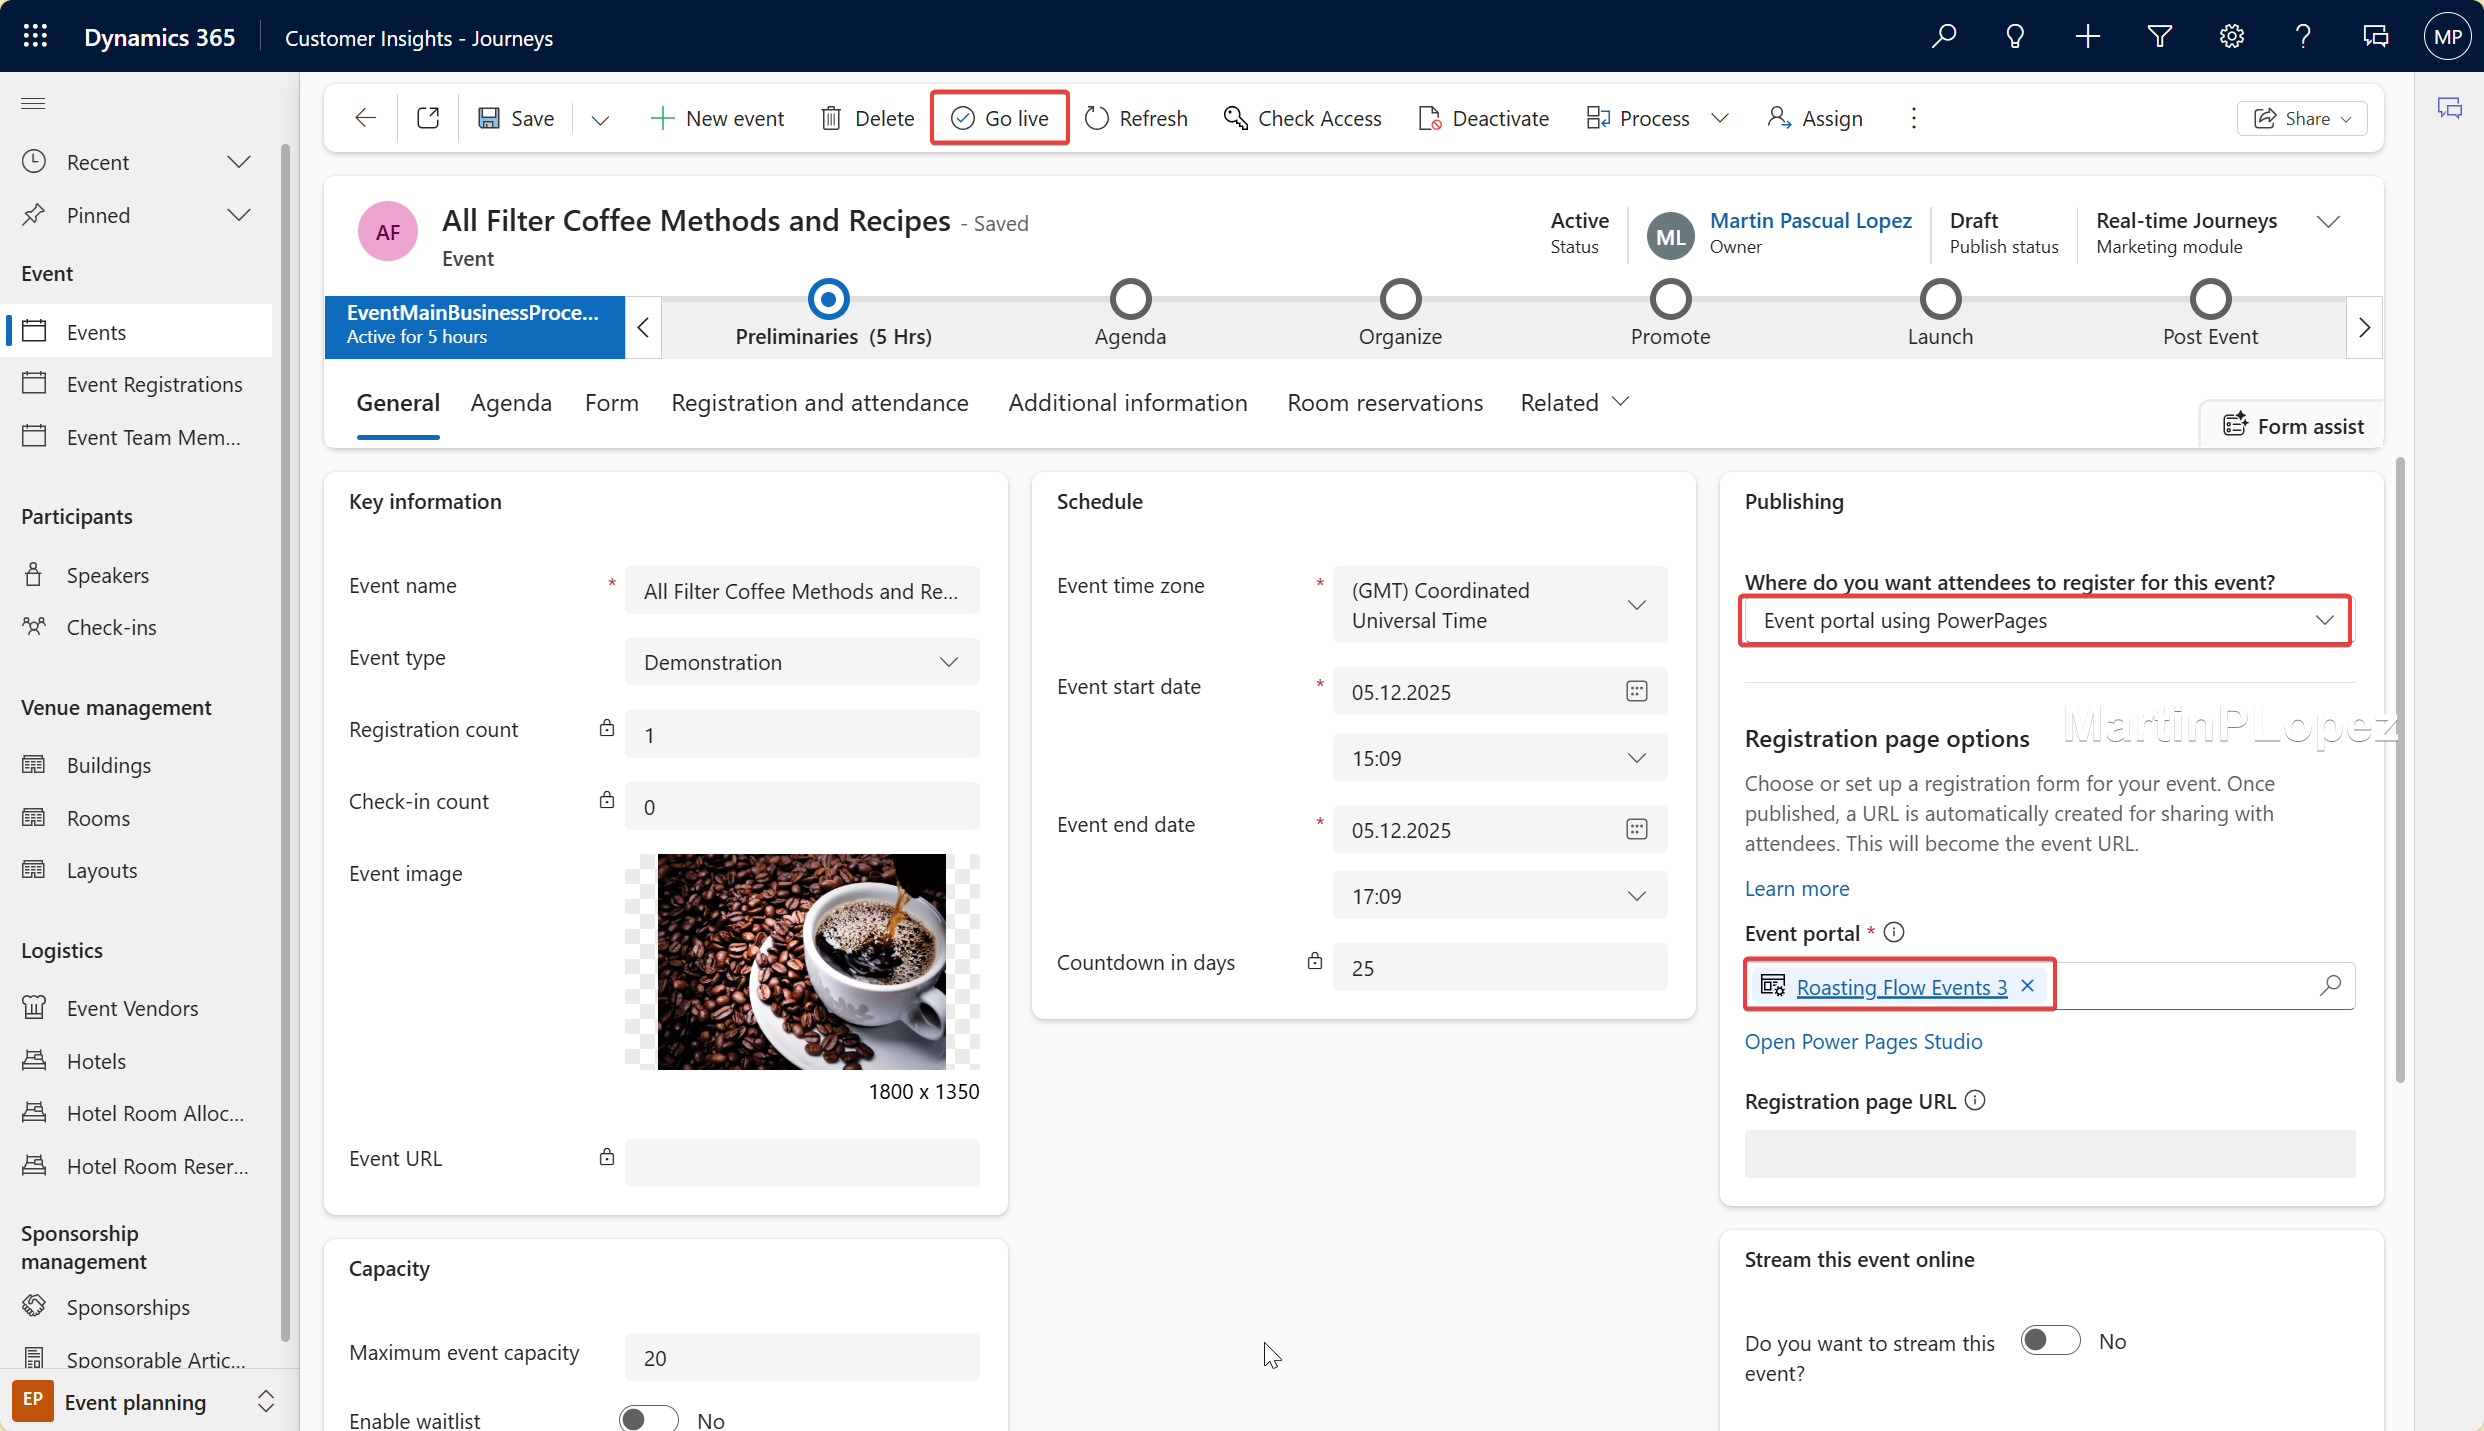
Publish the event.
You’ll now get a registration URL that points to your new branded Power Pages portal.
Conclusion
You should now have:
- A branded portal
- Showing events you publish in Dynamics 365 Customer Insights – Journeys
- With a working registration form embedded directly from CIJ
All ready for real visitors and registrations.
I highly recommend you try it out in a test event first:
- Publish a couple of events
- Register as a test attendee
- Confirm the registration and check that the data lands correctly in Customer Insights – Journeys
While preparing this article, I timed myself. The quickest I managed to set everything up was 15 minutes and 14 seconds. ⏱️
Do you think you can beat that?
Try to set it up yourself — I’d love to hear your times! 😁
👉 Email me your time or any questions, and feel free to tag me on LinkedIn so we can turn this into the fastest “time-to-live” event portal scenario in Microsoft’s ecosystem.