Beyond the Default: Set Up and Brand a Customer Insights - Journeys Event Web App

After writing the article on how to create a branded portal in 20 minutes in Power Pages, I discovered this feature from Customer Insights Journeys.
You can create a web app directly from Customer Insights Journeys and then deploy it to your hosting service, like Azure or Vercel. To test it, I created the event page of Roasting Flow which will display the events of my fake coffee shop 😉
I find the idea super interesting especially with the possibilities of extending and branding the application with AI. Because you host the site yourself, you do not need Power Pages capacity for the public event website. You are still responsible for your hosting costs and the licensing of Customer Insights - Journeys.
In this article, I go over how to set up a web app, run it locally, how I branded it so it aligns with my branding, and then tips to publish it online.
Customer Insights – Journeys can generate a lightweight event web app built with HTML, CSS, and JavaScript. Create separate web application records for http://localhost:3000 and your production HTTPS domain, authenticate both domains, and download the application.
You can then run it locally with Node.js, customize its branding, and deploy the contents of the public directory to a static hosting provider such as Azure Static Web Apps. Before deployment, verify the production values in public/js/config.js, and make sure each live event is published to the correct web application.
What are the Event Web Apps from Customer Insights Journeys?
The event web apps from Customer Insights Journeys are a feature where you can easily create a lightweight website to display your events directly integrated with dynamics customer insights. When you create one web application, you are able to download a zip file that contains the whole website in a lightweight web application built with HTML, CSS, and JavaScript. Once you have it downloaded locally, you can edit it and brand it to your needs.
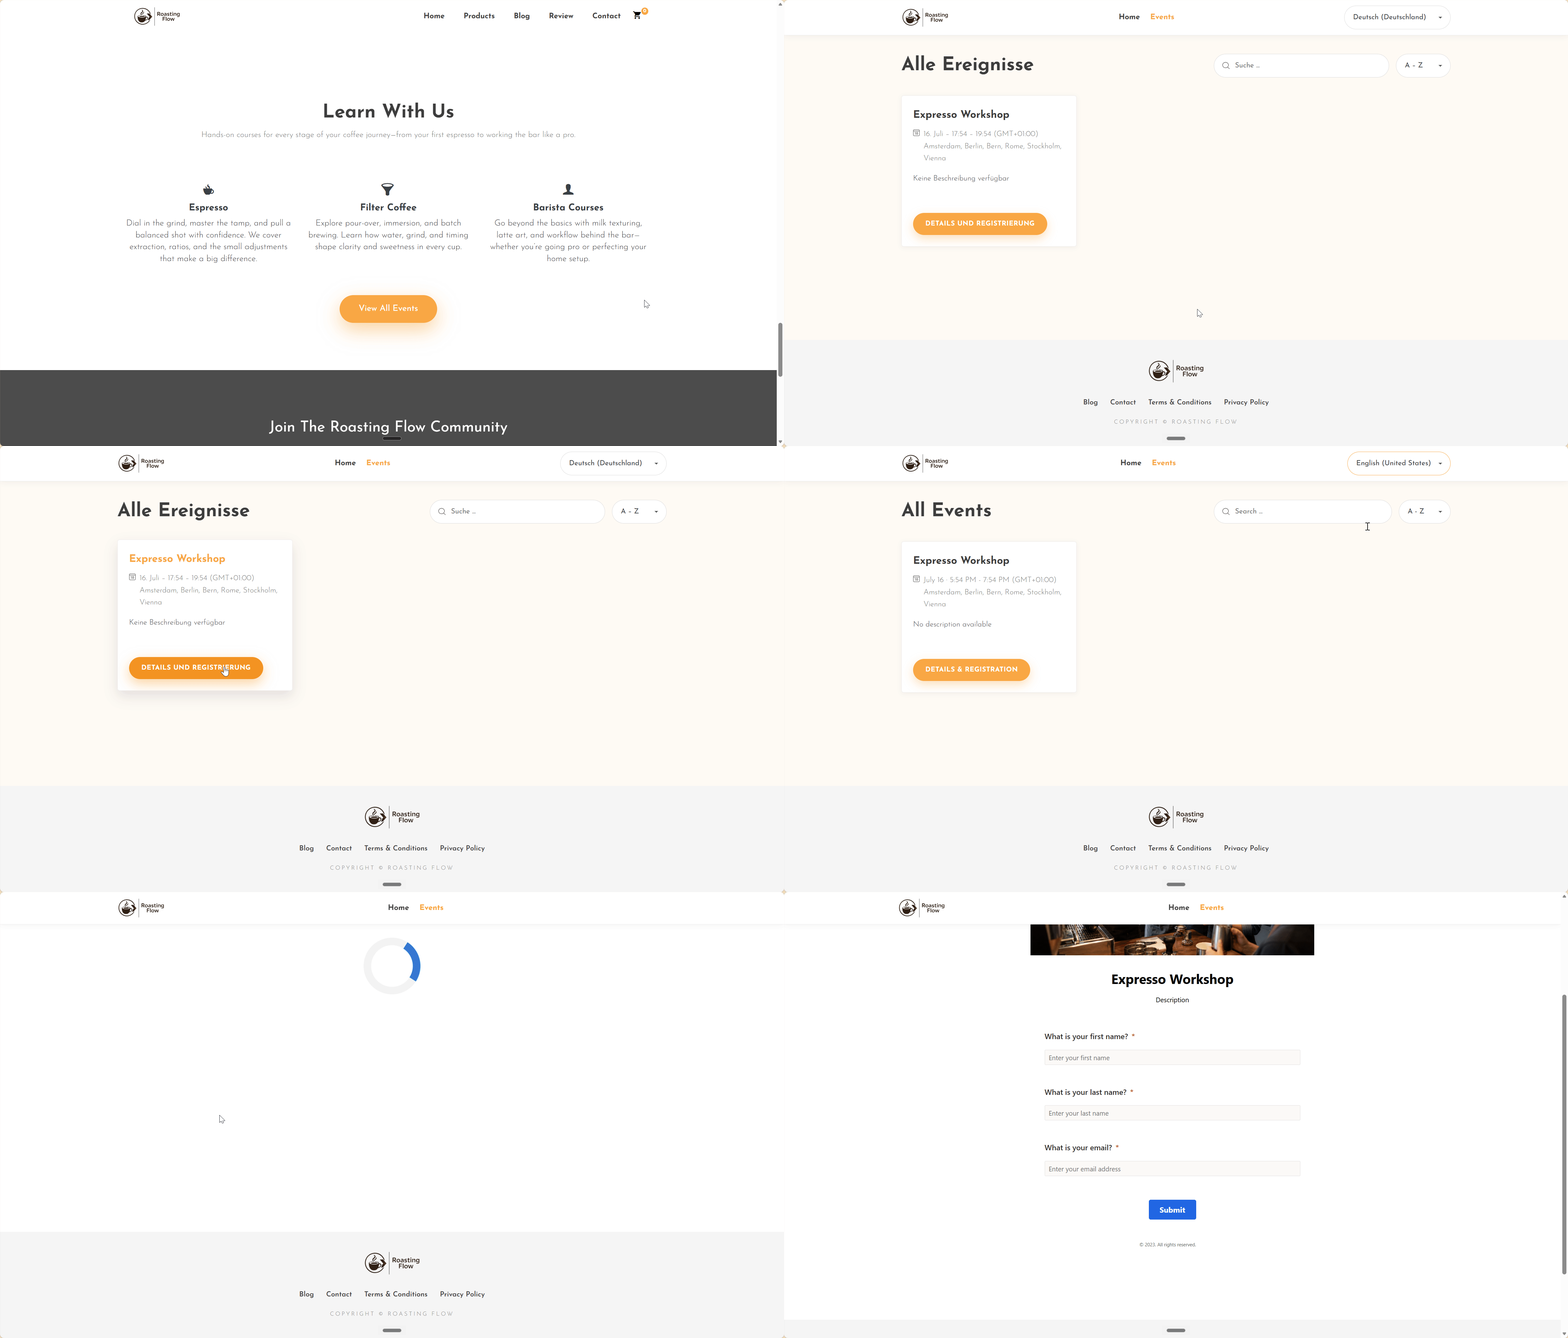
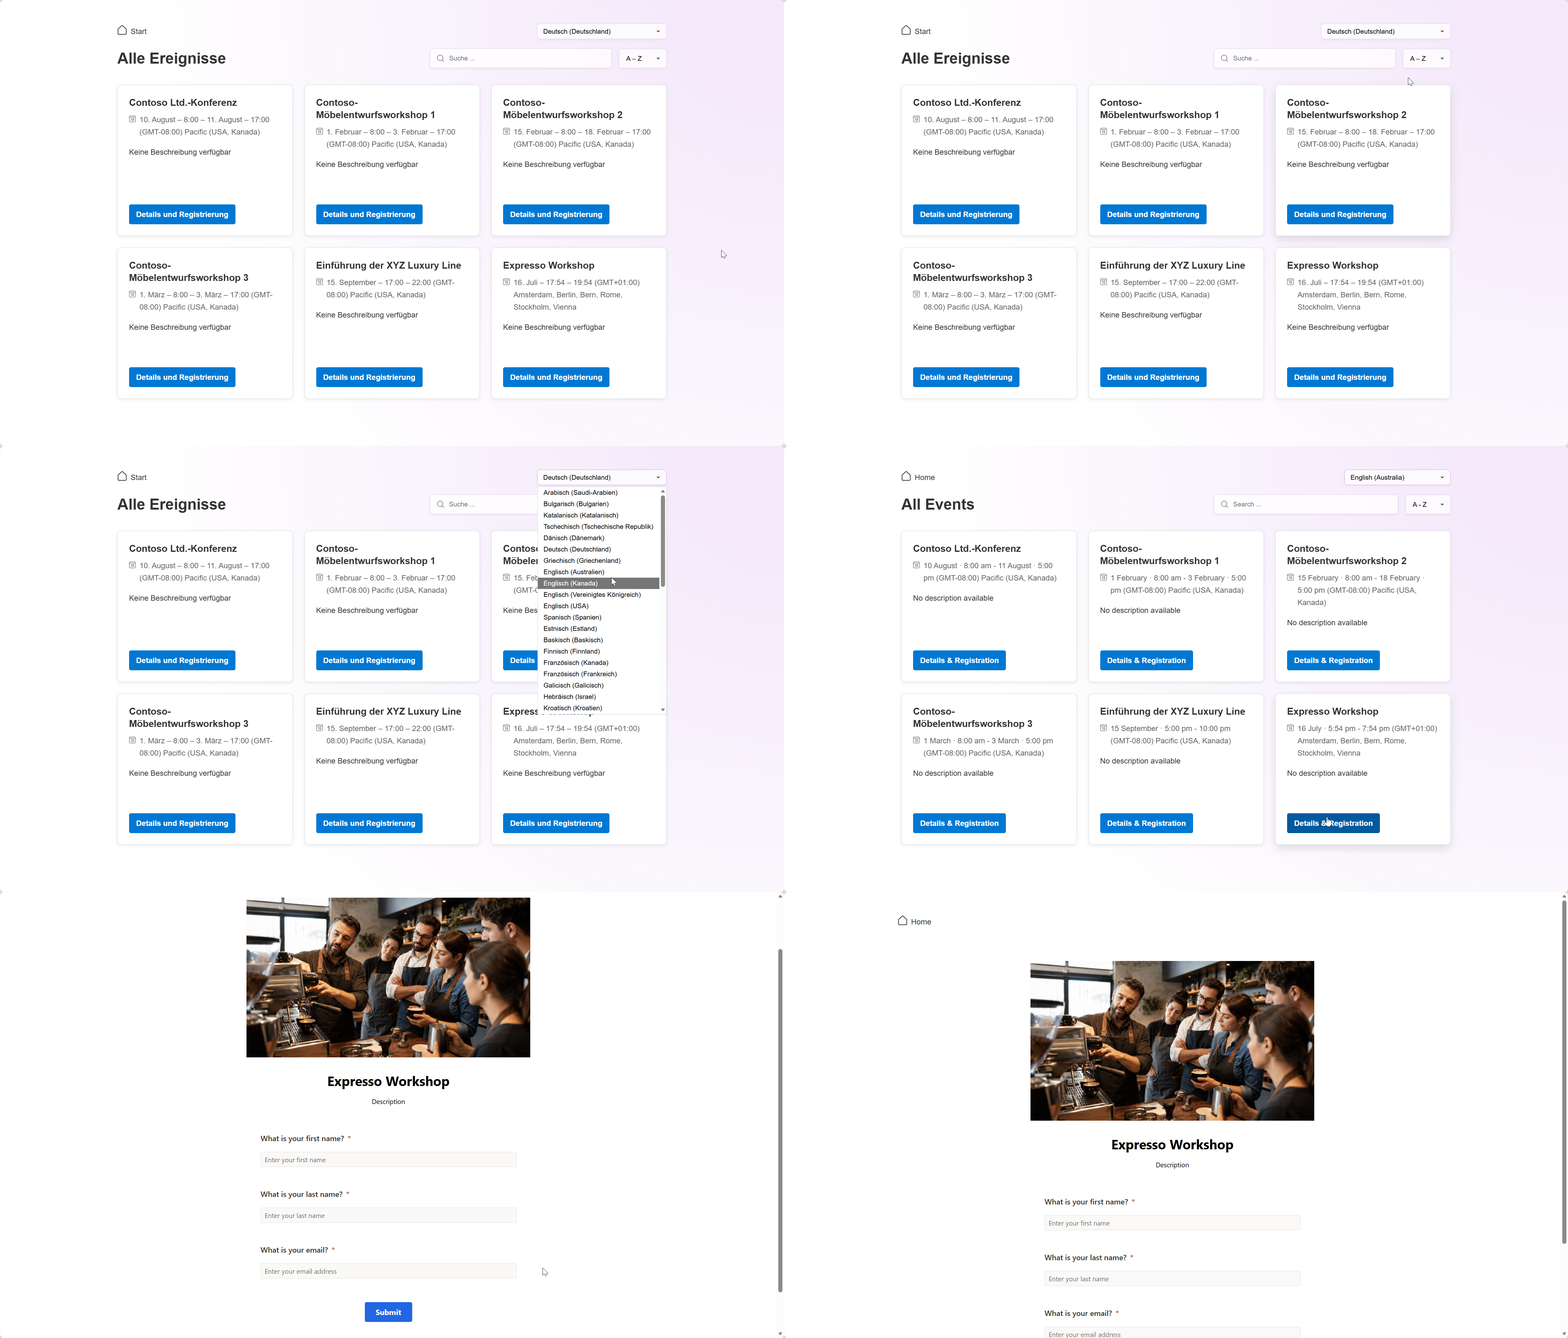
This allows you to be pretty flexible with regards to what you can do in the portal with the events, or not, or how to display them, apply some filters, sorting options, or searching options, as you are fully in control of your website. As well as multi-language options, which I think it’s better handled than in Power Pages.
Why not just stick to Power Pages?
Power Pages provides a low-code, managed option within the Power Platform and includes an event registration template for Customer Insights - Journeys. It is a good option when you want to build and maintain the website primarily through Power Pages Studio rather than working directly with the source code. But even some experts on Power Pages are ditching the Power Pages Studio, like Nick Doelman in this article
However, hosting your own web application gives you more control over the front-end experience, deployment process, and hosting provider. You can modify how events are displayed, introduce custom functionality, and use the development tools and frameworks that best fit your requirements.
Licensing is another consideration. Power Pages requires additional capacity for authenticated or anonymous users, whereas a self-hosted event web app uses the hosting plan you select. The most cost-effective option will depend on your expected traffic, maintenance requirements, and the capabilities your event website needs.
Yes, I vibe-coded the branding
In my case, I vibe-coded the branding for my web application. It simplifies the process of branding on the web portal, but most importantly, it will respect the structure that Customer Insights has created for the event portal and just build on top of that, avoid unnecessarily restructuring the application.
As with any AI-generated code, I reviewed and tested the changes before deploying them.
How I set it up
Configuring Dynamics
First thing we do in Customer Insights Journeys is go to our settings and scroll down to the event management section to click on web applications and then create a new one.
We will give that web application a name and an origin. The origin must match the domain where the application is hosted so that the browser’s CORS requests to the Customer Insights - Journeys API are allowed. I recommend creating two web applications:
- One with the origin to your actual domain, which in my case is
https://events.roastingflow.com - One with the origin pointing to
http://localhost:3000
This one will be entirely for your local calls, so you can see that it shows your events and it shows your event forms correctly.
Once it gets saved, the token is displayed, and the endpoints are also displayed like this:
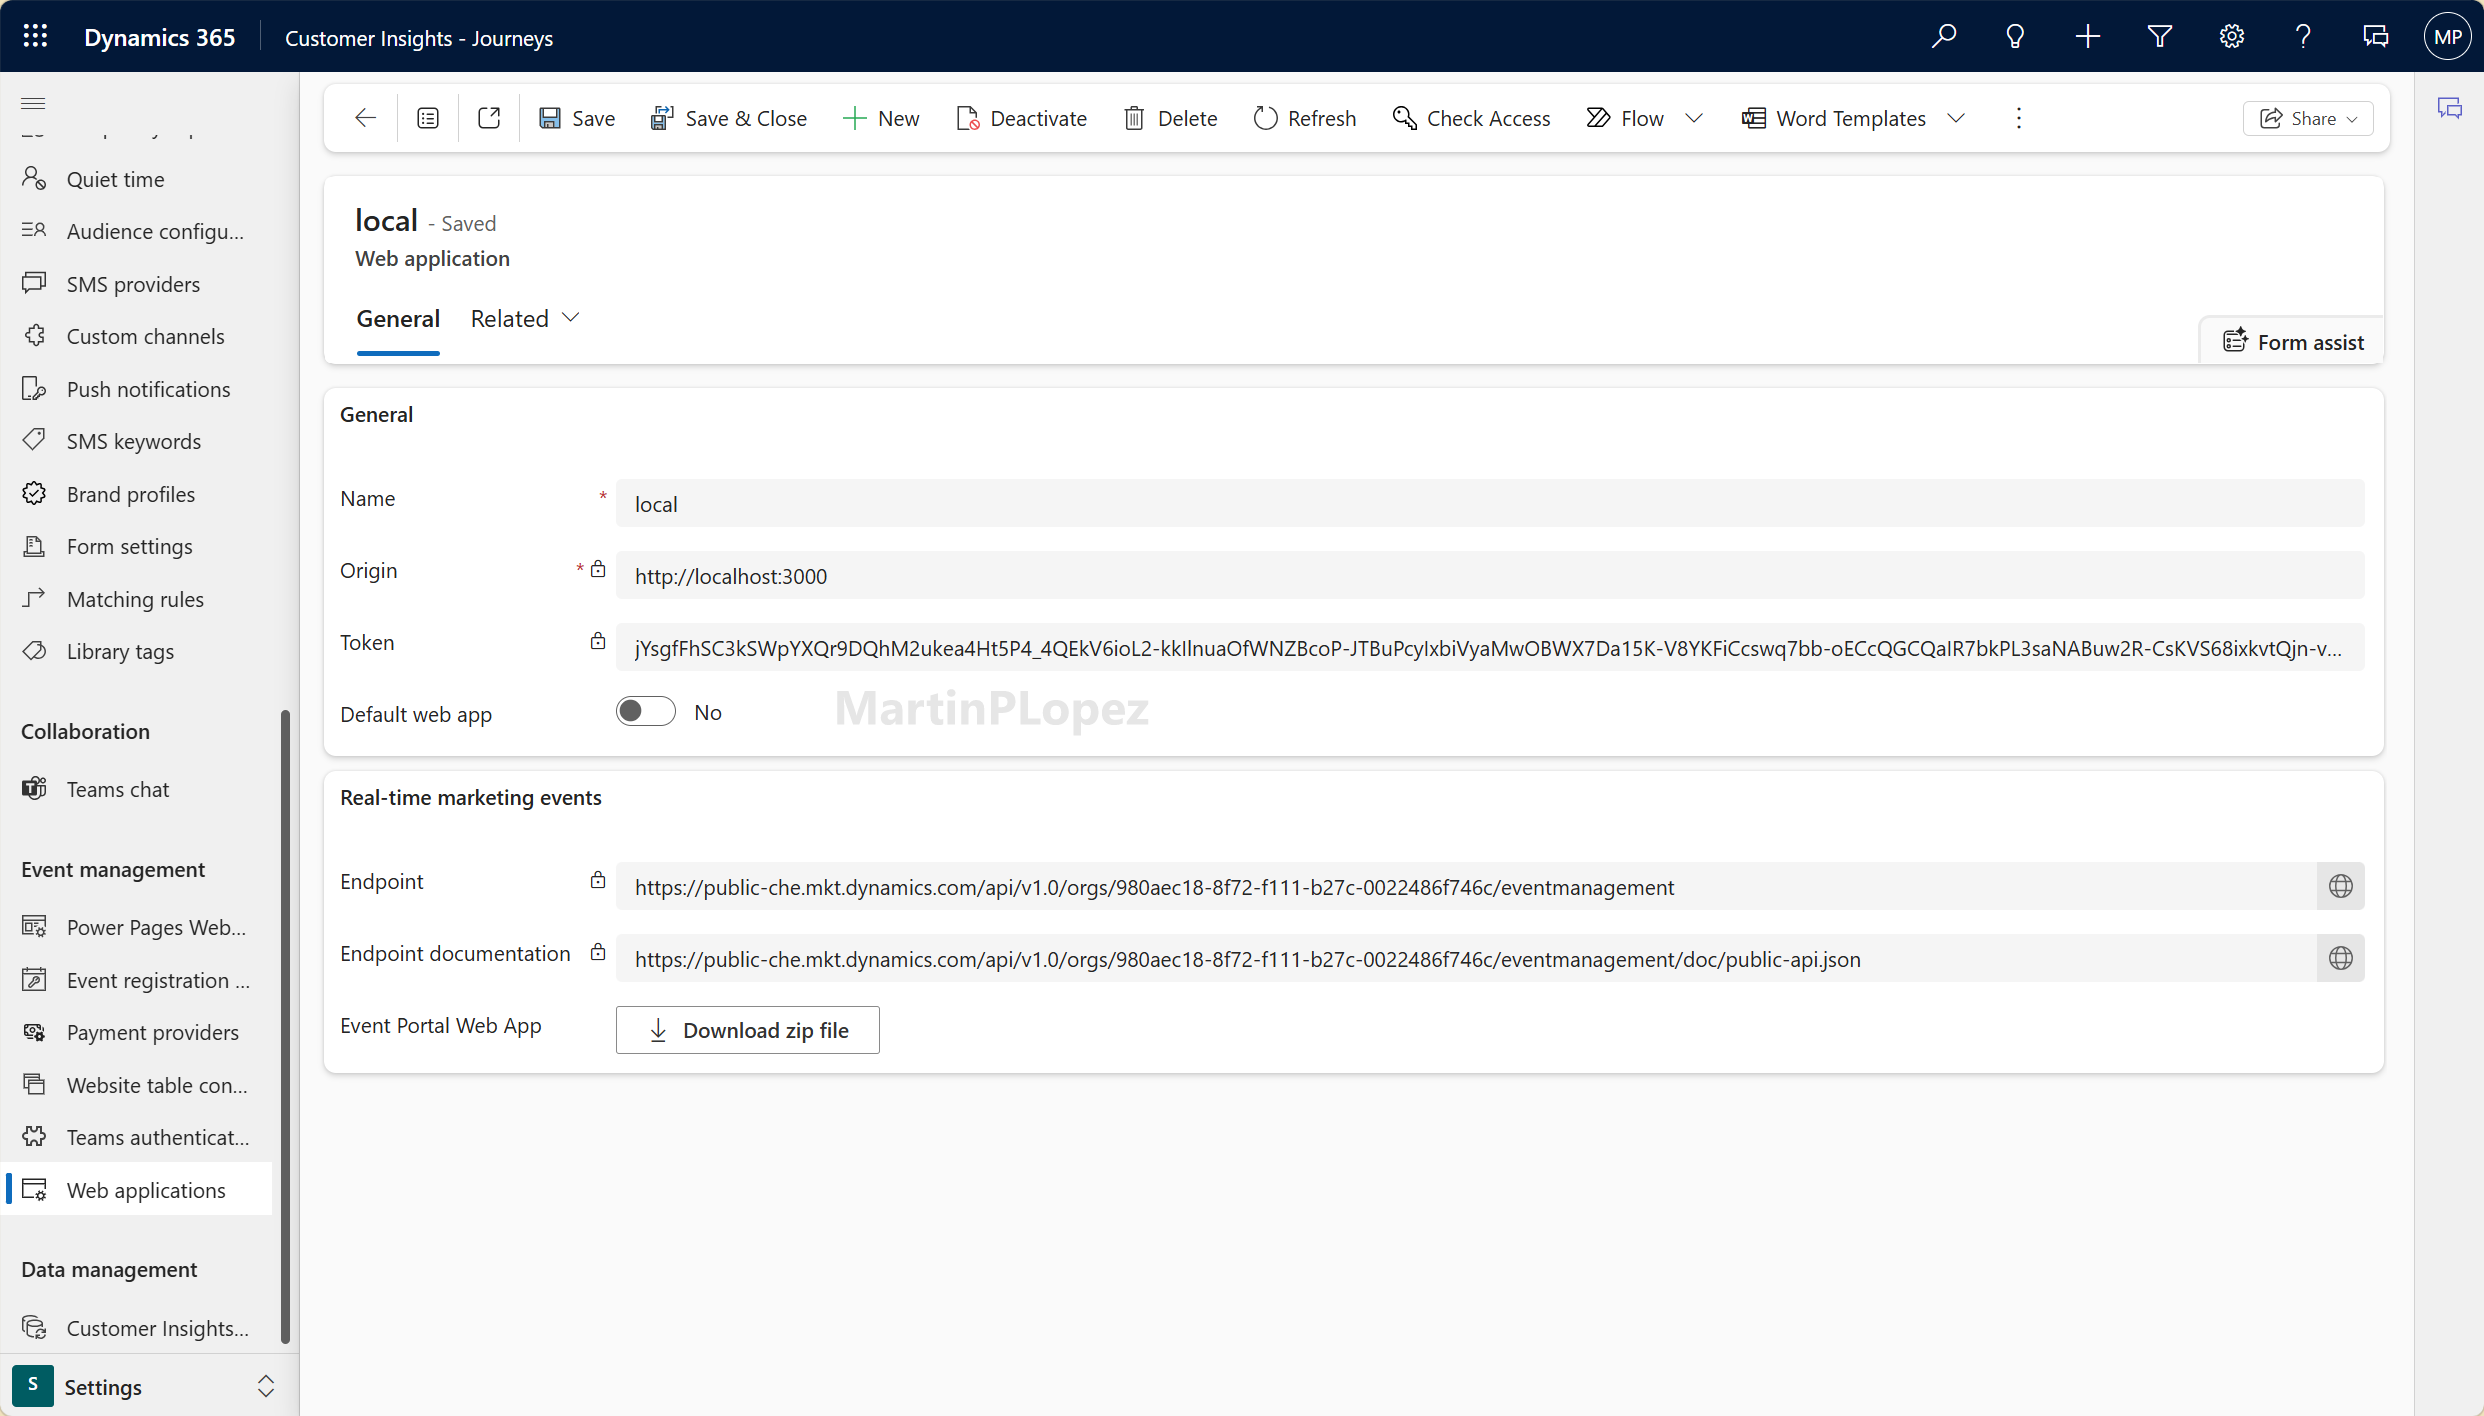
And under the endpoint documentation field, we will have an event portal web app field with a button attached to it, which allows us to download the zip file. This contains the actual website zip, we download it at this step.
In order to see the registration forms, it is needed to first verify the domain in Customer Insights Journeys. We will go to Settings Domains and enter the external form hosting for your actual domain and localhost.
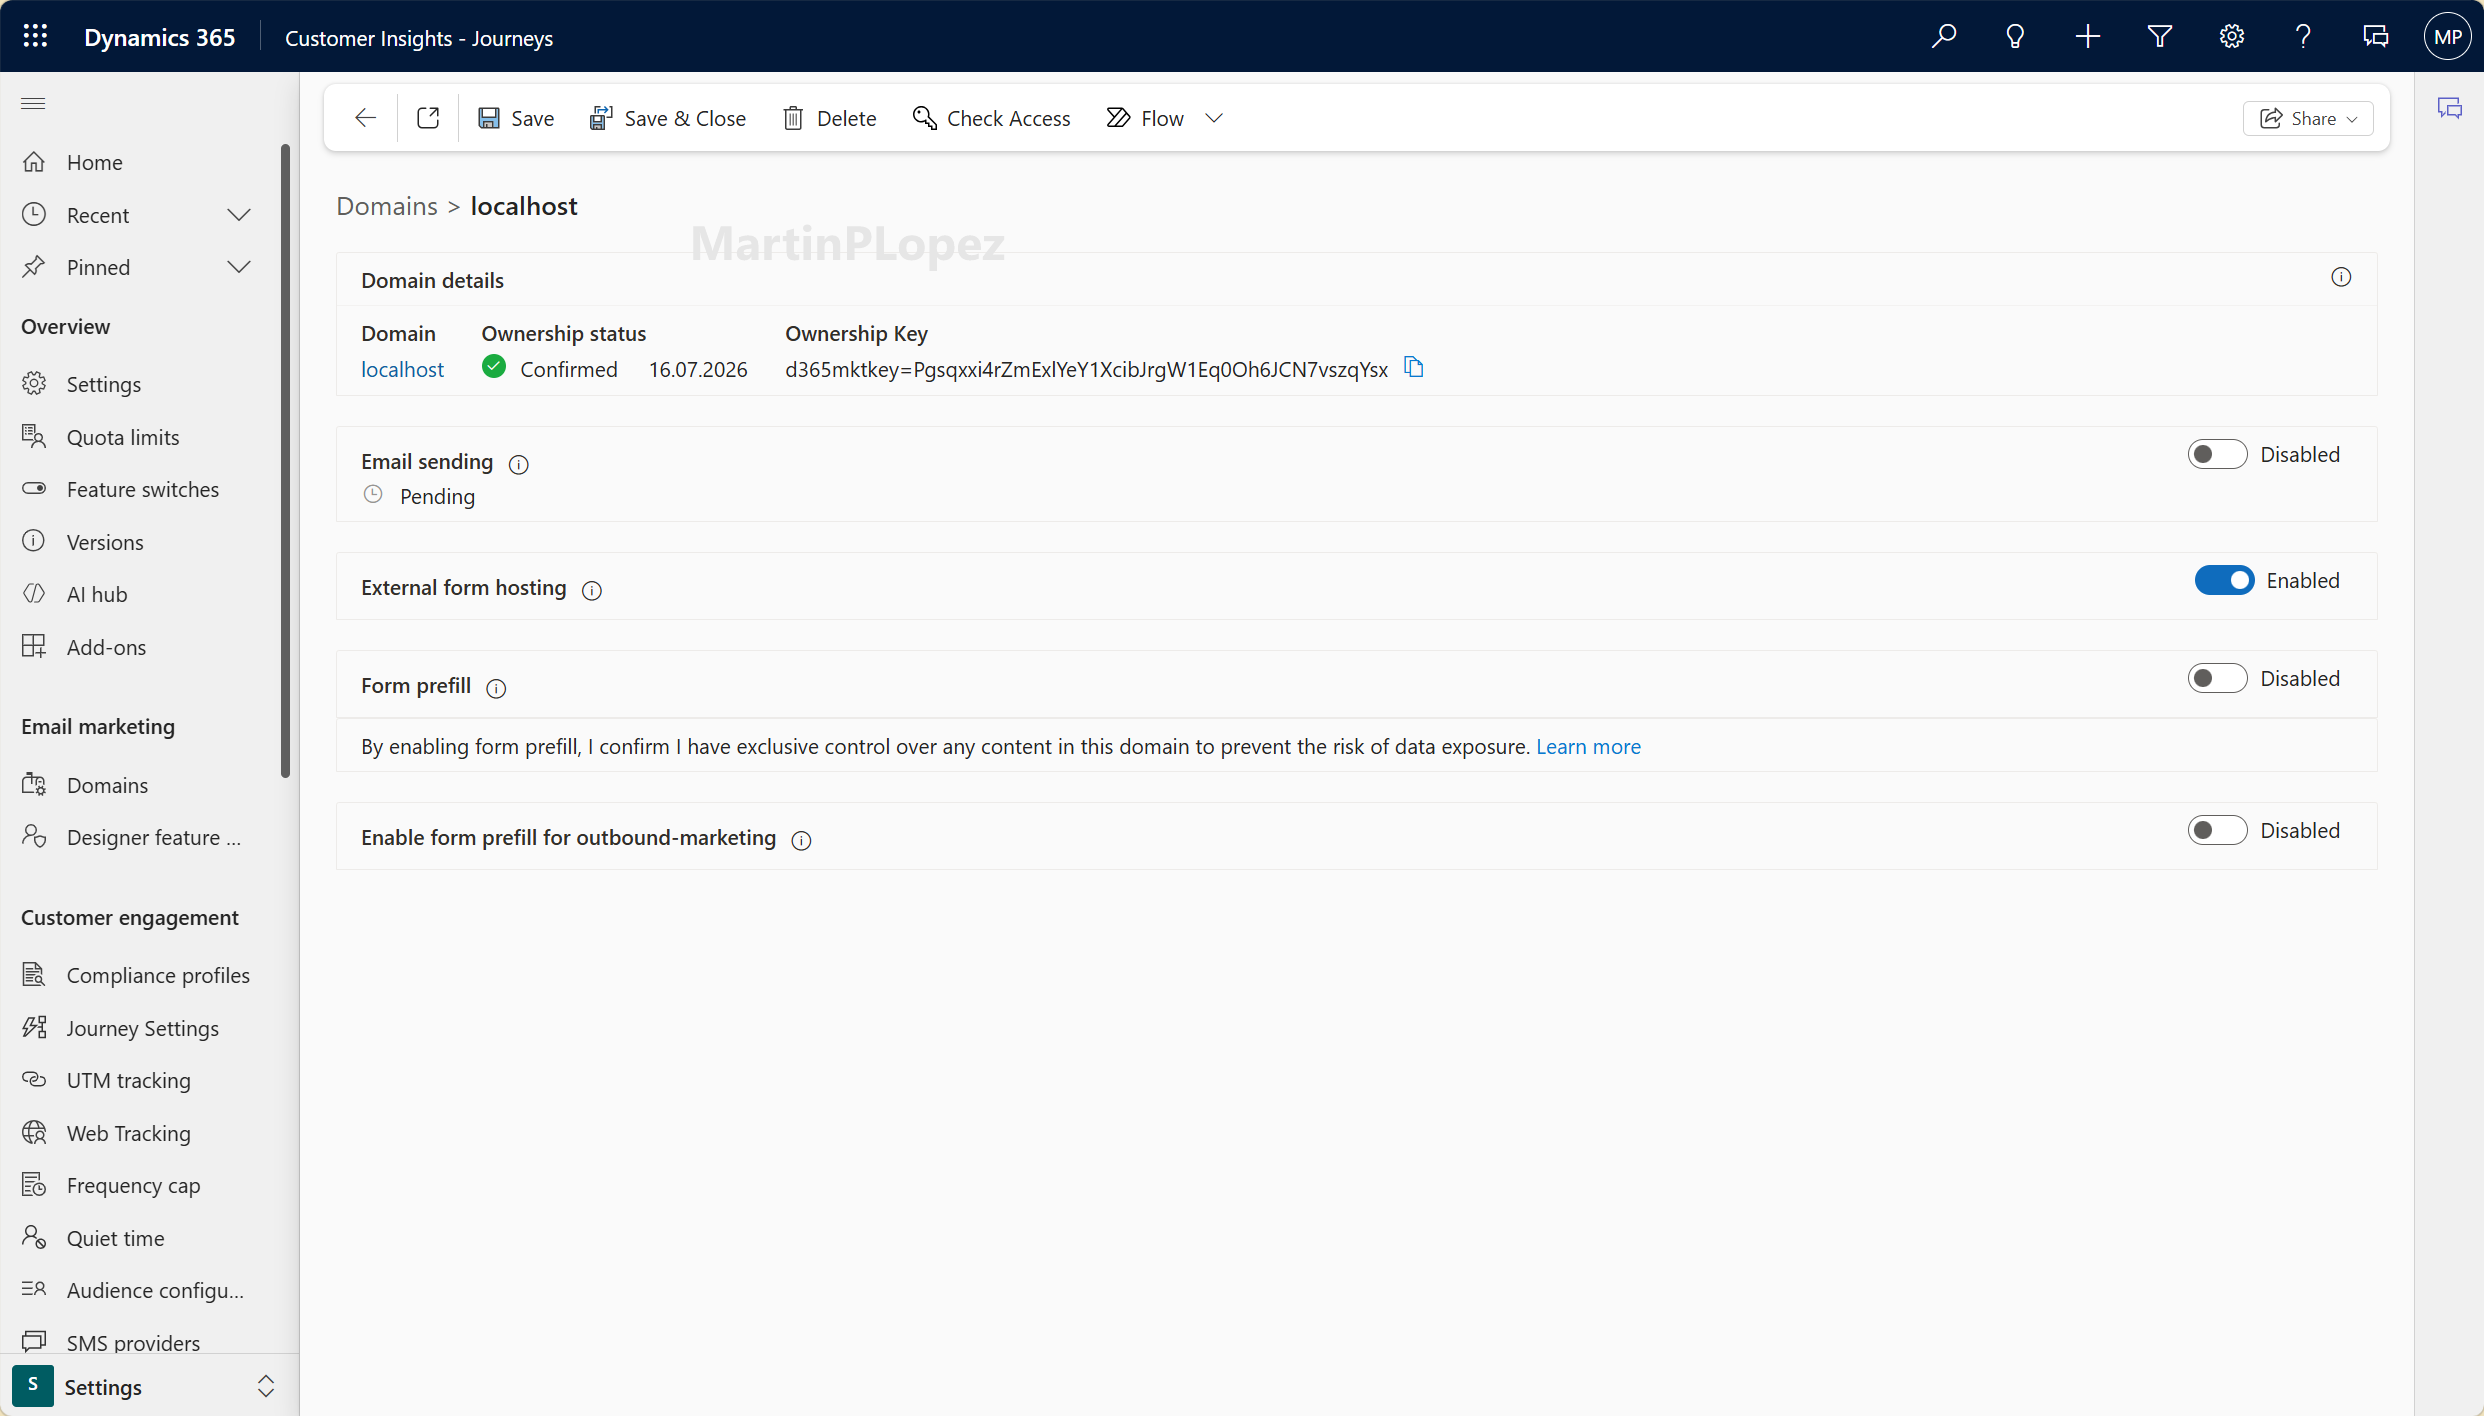
Open the event, go to General > Publishing, select Event portal using web application, choose the appropriate web application, and publish the event. Only live events published to the web application will appear on the site.
Running it locally
Once we download the zip, we can extract it and will find a README.md which is super useful with instructions on how to use the web app, here the prerequisites we have to run it locally:
- Set up a web application record for your domain in Customer Insights - Journeys > Settings > Web applications (required to allow the portal to call the public API)
- Authenticate your domains in Customer Insights - Journeys > Settings > Domains (required for embedded event registration forms)
- Node.js v22 or higher (optional; only needed if you use the provided development server)
The first two we did in the previous step. So after we installed node.js, we can test our web app by opening a terminal in the directory of the webapp and running first npm install. After the packages are installed, we can run npm start, and we’ll get the server that is working locally:
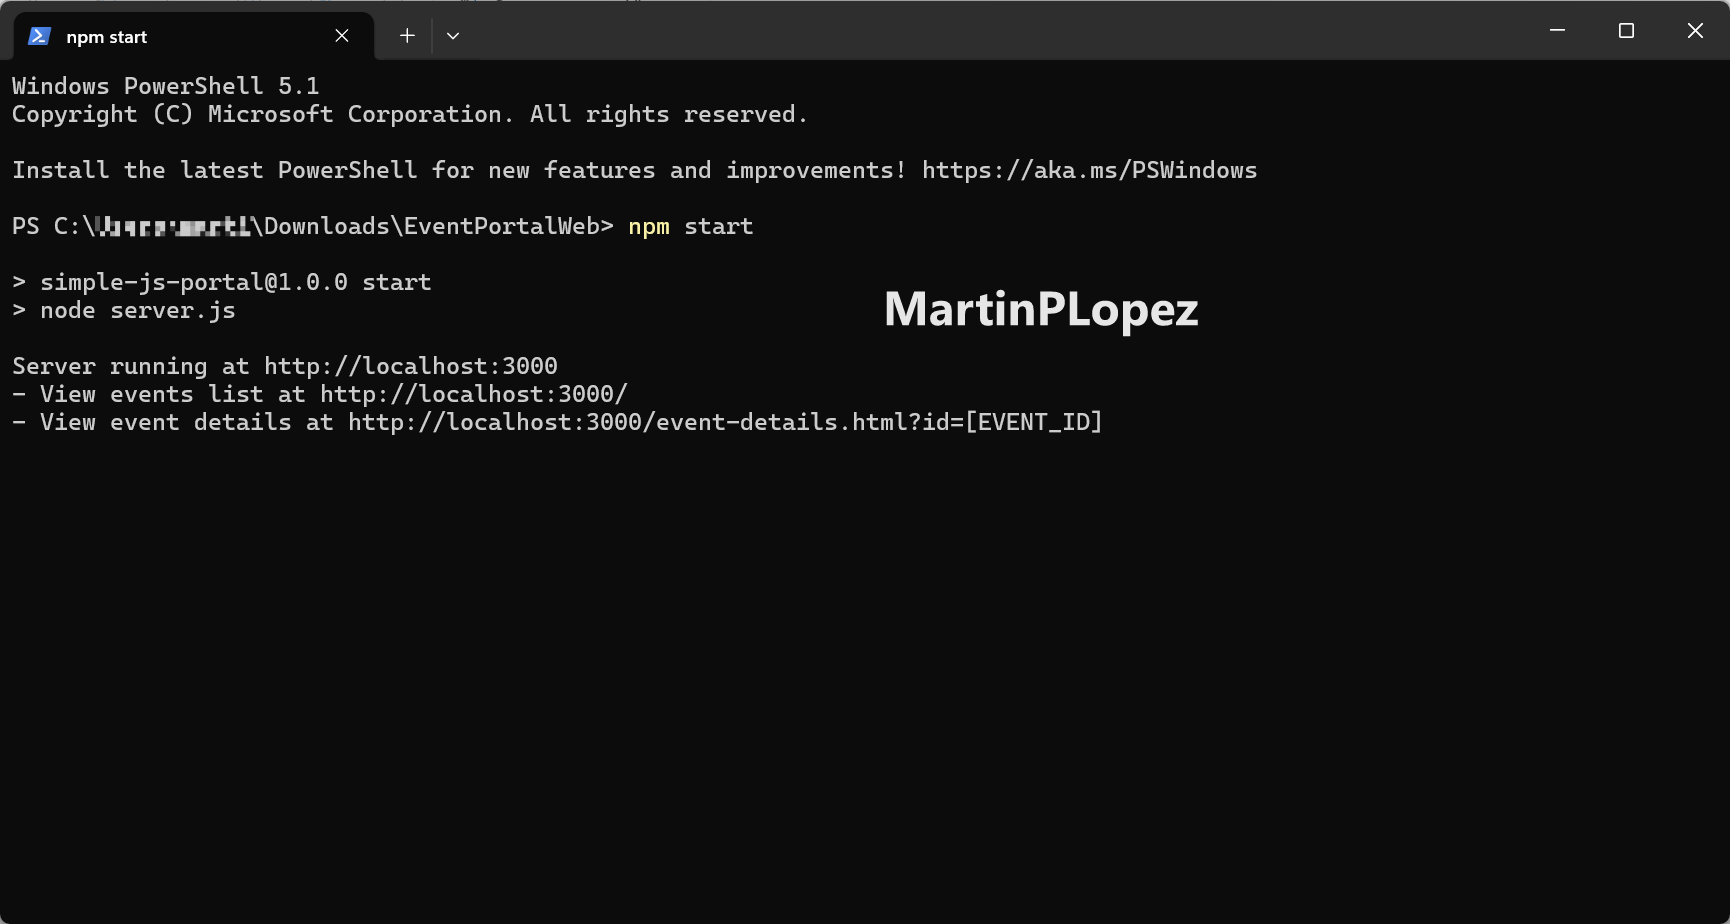
If we go to the address in a browser in our computer (the one after “Server running at “), we’ll be able to see our event website and navigate it:
Once we have this we can setup the branding of the web app.
Brand it with AI
I will not go deep in this part, I’ll just say, that I used Claude Code to brand the website using the following prompt (for my case):
This folder contains a webapp of Dynamics Customer Insights. It shows the events of this coffee shop "https://www.roastingflow.com/" Can you make it coherent with the style, logos and structures of the original webpage? It will be events.roastingflow.com in the future
This generated the plan you can find in my GitHub repository of the website.
The result you can find in the Event Portal of Roasting Flow
Deploy it to your hosting service
Once we got out portal correctly running locally , we can deploy it to our hosting provider. This means that the portal will be accessible to the rest of the world. In my case I use GitHub to host my code and Azure Static Web Apps to host the website. But Vercel, Netlify or Cloudflare Pages would be fine as well.
Before deployment, verify that BASE_URL, ORG_ID, TOKEN, and WEBAPP_ID in public/js/config.js contain the values from your production web application record.
The website will only show the events if these values come from the Web App Record we created with the domain for production (in my case events.roastingflow.com). If we use the ones from localhost it will not work.
Before deployment, verify that BASE_URL, ORG_ID, TOKEN, and WEBAPP_ID in public/js/config.js contain the values from your production web application record.
The production domain must match the origin configured for that record. Values created for http://localhost:3000 are intended for local development and should not be used by the production website.
WEBAPP_ID is optional. When it is provided, the website only displays events published to that specific web application.
Tips and Tricks
- If you’re not familiar with Azure Static Web Apps (SWA), you’re a developer and didn’t consider it as an option. I recommend it especially for this use case. Depending on your needs, it can get hosted for free even. Here the Microsoft Learn Documentation.
- If you use Azure SWA and want to avoid problems with the token and webapp_id, you can take advantage of the environment variables of the app to have the right token and webapp_id dynamically filled out. Feel free to fork my repo in GitHub where it’s done already.
- If you want to dig deeper in the API options, Web Applications leverage the same API that Jonas Schwarzwälder talks about in this amazing article
Conclusion
Customer Insights - Journeys event web apps provide an interesting alternative when you need more control than the standard event experience offers. The generated application already includes event listings, search, event details, embedded registration forms, and multilingual support, while still giving you complete control over its appearance and hosting.
Using AI made the initial branding work much faster, but branding is only the beginning. Because the source code is yours to customize, you can introduce different event layouts, advanced filtering and sorting, additional languages, and experiences tailored to your audience.
Over the next few weeks, I will continue exploring what can be built with this architecture. Particularly its internationalization capabilities and ways to create a more flexible event discovery experience.